Frankie Patterns: Free Pocket Frankie Crochet Amigurumi
Frankie Patterns: The Free Pocket Frankie Crochet Amigurumi Guide
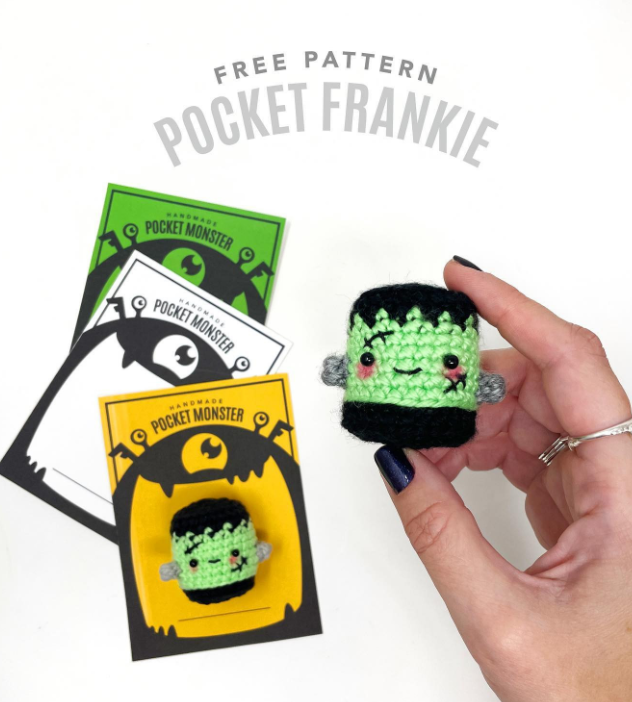
If you’ve been searching for adorable frankie patterns to stitch this Halloween, meet Pocket Frankie: a tiny, kawaii-style Frankenstein’s monster that fits right in the palm of your hand. Of all the frankie patterns out there, this one stands out because it is quick, beginner-friendly, and uses simple stitches to create a surprisingly expressive little character with a black flat-top head, green face, stitched scar, and gray neck bolts.
In this guide you’ll find everything you need to make your own Pocket Frankie: the tools and materials list, the US crochet terms used, helpful pattern notes, and the full round-by-round instructions for the head/body and the bolts. Whether you’re browsing frankie patterns for a craft fair, a Halloween gift, or a quick weekend project, this free pocket-sized monster is a great place to start.
Pattern credit: this Pocket Frankie design is by The Knotty Boss. If you share or adapt these frankie patterns, please credit the original designer and link back to their original free pattern page.
Why Pocket Frankie Is One of the Best Frankie Patterns for Beginners
Many frankie patterns involve complicated color changes, multiple pieces, or tricky assembly. Pocket Frankie keeps things simple: the entire head and body is worked as one piece, starting as a square and finishing as a rounded top, with just three yarn colors and a pair of small bolts. That’s why this design is rated Beginner/Easy, and why it’s a favorite among the frankie patterns crocheters recommend to friends who are new to amigurumi.
Because Pocket Frankie is so small, it also works up in an evening. That makes these frankie patterns perfect for making a whole batch of little monsters for trick-or-treat favors, party goodie bags, or handmade pocket-monster gift cards like the ones pictured above.
Tools and Materials for These Frankie Patterns
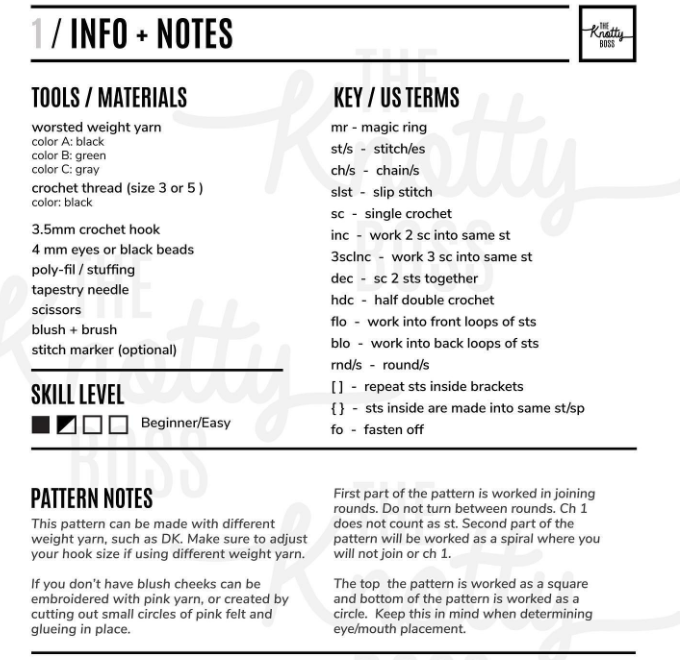
- Worsted weight yarn: Color A – black, Color B – green, Color C – gray
- Crochet thread (size 3 or 5) in black, for embroidering the face details
- 3.5mm crochet hook
- 4mm eyes or black beads
- Poly-fil / stuffing
- Tapestry needle
- Scissors
- Blush and brush (for the cheeks)
- Stitch marker (optional)
Skill level: Beginner/Easy.
Key US Terms Used in These Frankie Patterns
- mr – magic ring
- st/s – stitch/es
- ch/s – chain/s
- slst – slip stitch
- sc – single crochet
- inc – work 2 sc into same stitch
- 3sc inc – work 3 sc into same stitch
- dec – sc 2 stitches together
- hdc – half double crochet
- flo – work into front loops of stitches
- blo – work into back loops of stitches
- rnd/s – round/s
- [ ] – repeat stitches inside brackets
- { } – stitches inside are made into the same stitch/space
- fo – fasten off
Pattern Notes
- This pattern can be made with different weight yarns, such as DK. Make sure to adjust your hook size if using a different weight yarn.
- If you don’t have blush, the cheeks can be embroidered with pink yarn, or created by cutting out small circles of pink felt and gluing them in place.
- The first part of the pattern is worked in joining rounds. Do not turn between rounds. Ch 1 does not count as a stitch. The second part of the pattern is worked as a spiral where you will not join or ch 1.
- The top of the pattern is worked as a square and the bottom of the pattern is worked as a circle. Keep this in mind when determining eye and mouth placement.
Full Written Pattern for This Frankie Patterns Favorite
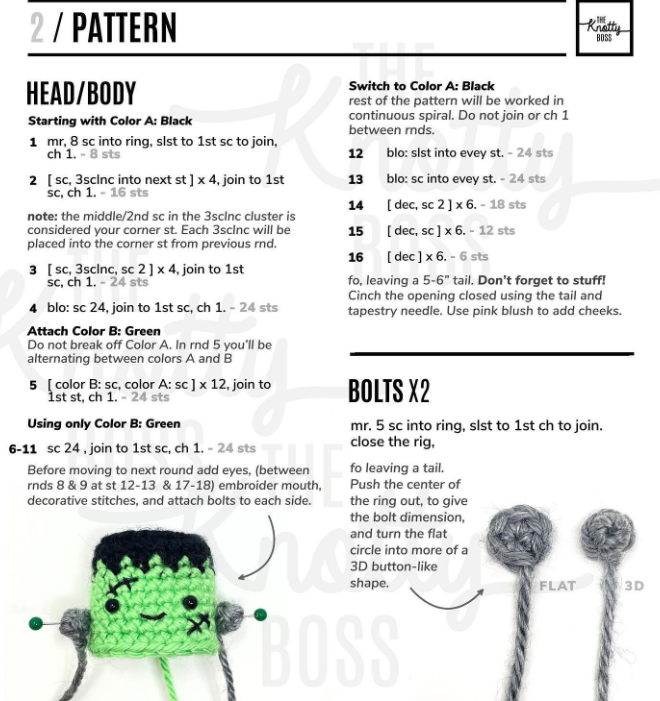
Head / Body
Starting with Color A: Black
Rnd 1: mr, 8 sc into ring, slst to 1st sc to join, ch 1. (8 sts)
Rnd 2: [sc, 3sc inc into next st] x 4, join to 1st sc, ch 1. (16 sts)
Note: the middle/2nd sc in the 3sc inc cluster is considered your corner stitch. Each 3sc inc will be placed into the corner stitch from the previous round.
Rnd 3: [sc, 3sc inc, sc 2] x 4, join to 1st sc, ch 1. (24 sts)
Rnd 4: blo: sc 24, join to 1st sc, ch 1. (24 sts)
Attach Color B: Green. Do not break off Color A. In round 5 you’ll be alternating between colors A and B.
Rnd 5: [color B: sc, color A: sc] x 12, join to 1st st, ch 1. (24 sts)
Using only Color B: Green
Rnds 6–11: sc 24, join to 1st sc, ch 1. (24 sts)
Before moving to the next round, add the eyes (between rounds 8 & 9 at stitches 12–13 & 17–18), embroider the mouth and decorative stitches, and attach the bolts to each side.
Switch to Color A: Black. The rest of the pattern will be worked in a continuous spiral. Do not join or ch 1 between rounds.
Rnd 12: blo: slst into every st. (24 sts)
Rnd 13: blo: sc into every st. (24 sts)
Rnd 14: [dec, sc 2] x 6. (18 sts)
Rnd 15: [dec, sc] x 6. (12 sts)
Rnd 16: [dec] x 6. (6 sts)
Fasten off, leaving a 5–6″ tail. Don’t forget to stuff! Cinch the opening closed using the tail and a tapestry needle. Use pink blush to add cheeks.
Bolts (make 2)
Color C: Gray. mr, 5 sc into ring, slst to 1st sc to join, close the ring. Fasten off, leaving a tail. Push the center of the ring out to give the bolt dimension, and turn the flat circle into more of a 3D button-like shape. Use the tail to attach one bolt to each side of the head.
Finishing Touches for Your Frankie Patterns Project
The little details are what make these frankie patterns so charming. Use black crochet thread to embroider a small smile and a stitched scar across the forehead, and add a couple of tiny “x” stitches for that classic monster look. A touch of pink blush on the cheeks gives Pocket Frankie an extra-cute kawaii finish, and it’s a technique that works on many other frankie patterns and amigurumi characters too.
Tips for Getting the Best Results from Frankie Patterns
- Alternate colors A and B carefully in round 5 — this is the round that creates the jagged hairline effect that makes these frankie patterns instantly recognizable.
- Stuff firmly before closing the top so Pocket Frankie keeps a neat, boxy shape.
- Place the eyes low on the green section for a cuter, younger-looking face, a trick that works on most frankie patterns.
- Push the center of each bolt outward to make it 3D — a small step that makes a big visual difference.
- Make a whole set in different colors to create a matching “pocket monster” collection.
Ways to Use Pocket Frankie
- Attach a keyring for a Halloween bag charm.
- Pair with a printed “handmade pocket monster” card for gifts or craft-fair sales.
- Tuck one into a Halloween treat bag or advent-style countdown.
- Display a group of them on a shelf as spooky-season decor.
Frequently Asked Questions About Frankie Patterns
Are these frankie patterns free?
Yes, the Pocket Frankie pattern shared here is a free pattern designed by The Knotty Boss. It’s one of the most popular free frankie patterns for beginners.
What skill level do I need for frankie patterns like this one?
Pocket Frankie is rated Beginner/Easy. If you can work single crochet, increases, decreases, and a magic ring, you can make these frankie patterns without trouble.
What yarn works best for frankie patterns?
This design uses worsted weight yarn with a 3.5mm hook, but the notes say you can use other weights such as DK. Just adjust your hook size, and remember that a different yarn weight will change the finished size of your frankie patterns project.
How big is Pocket Frankie?
It’s a small, palm-sized amigurumi, which is why it’s called a “pocket” monster. Using thicker or thinner yarn will make your version larger or smaller.
Can I sell items made from these frankie patterns?
Selling policies are set by the original designer, so check the terms on The Knotty Boss’s original pattern page before selling finished items made from these frankie patterns, and always credit the designer.
How do I attach the eyes and bolts?
Insert the 4mm safety eyes between rounds 8 and 9 before you close the head, then sew a bolt to each side of the head using the gray yarn tails. This step is the same across many other frankie patterns for amigurumi monsters.
Final Thoughts on Frankie Patterns
Pocket Frankie proves that the best frankie patterns don’t have to be complicated to be memorable. With just a few rounds, three colors, and a couple of finishing details, you get a tiny monster with tons of personality. Save this guide, try the pattern in your own color combos, and share your finished monsters so other crocheters can discover these frankie patterns too. Happy stitching and happy haunting!