Crochet Baby Gifts Free Pattern: The Cutest Amigurumi Panda You Can Make as a Handmade Baby Gift
If you’ve been searching for crochet baby gifts free pattern ideas that are precious, personal, and completely free to follow, this adorable amigurumi panda tutorial is exactly what you need. This crochet baby gifts free pattern walks you through every single step — from the body and limbs to the sculpted face and sweet little headband — so you can create a truly one-of-a-kind handmade gift for a baby shower, newborn welcome, or nursery decor piece. There is something incredibly special about giving a crochet baby gifts free pattern creation instead of a store-bought toy, and this panda design has become one of the most-loved crochet baby gifts free pattern projects because of its soft texture, expressive face, and heirloom-quality finish.
In this guide you’ll find the full crochet baby gifts free pattern instructions for the body, legs, arms, head, tail, ears, muzzle, eye sculpting, and even a matching crocheted headband — everything you need to complete this crochet baby gifts free pattern from start to finish. Whether you’re an experienced amigurumi maker or trying your first crochet baby gifts free pattern project, this tutorial is detailed enough to guide you through every joint, every round, and every finishing touch.
Why This Crochet Baby Gifts Free Pattern Is a Must-Make
Handmade gifts carry a warmth that store-bought items simply can’t match, and that’s exactly why this crochet baby gifts free pattern has become so popular among crocheters preparing for a baby shower or a new arrival. This particular crochet baby gifts free pattern includes mobile jointed limbs and head, meaning the finished panda can be posed — arms up, head tilted, legs bent — making it an even more charming crochet baby gifts free pattern keepsake that a family will treasure for years.
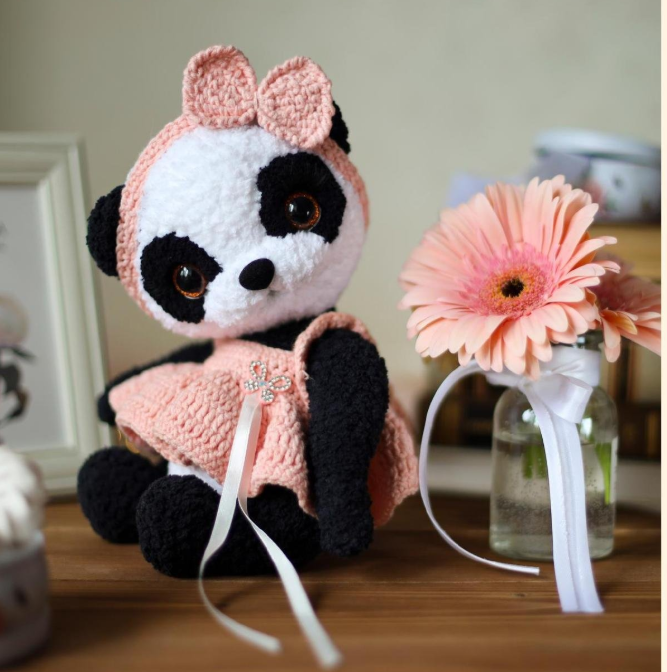
Below is a preview of the finished panda made from this crochet baby gifts free pattern tutorial, dressed in a soft pink outfit with a matching bow headband.
Materials Needed for This Crochet Baby Gifts Free Pattern
Before you start this crochet baby gifts free pattern, gather the following recommended materials and tools. Using the right supplies will make this crochet baby gifts free pattern project go smoothly from the very first round.
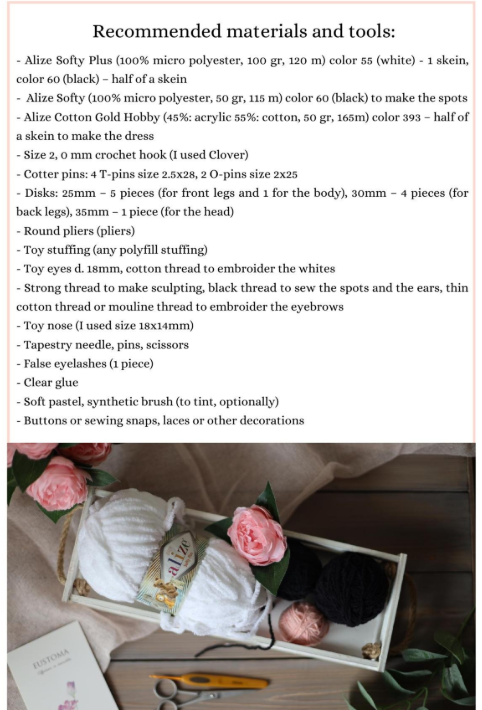
- Alize Softy Plus (100% micro polyester, 100 gr, 120 m) color 55 (white) — 1 skein, color 60 (black) — half a skein
- Alize Softy (100% micro polyester, 50 gr, 115 m) color 60 (black) to make the spots
- Alize Cotton Gold Hobby (45% acrylic, 55% cotton, 50 gr, 165 m) color 393 — half a skein to make the dress
- Size 2.0 mm crochet hook
- Cotter pins: 4 T-pins size 2.5×28, 2 O-pins size 2×25
- Disks: 25mm — 5 pieces (front legs and body), 30mm — 4 pieces (back legs), 35mm — 1 piece (head)
- Round pliers
- Toy stuffing (any polyfill)
- Toy eyes 18mm, cotton thread for embroidering the whites
- Strong thread for sculpting, black thread to sew spots and ears, thin cotton or mouline thread for eyebrows
- Toy nose (size 18x14mm)
- Tapestry needle, pins, scissors
- False eyelashes (1 piece)
- Clear glue
- Soft pastel and synthetic brush (optional, for tinting)
- Buttons, sewing snaps, laces, or other decorations
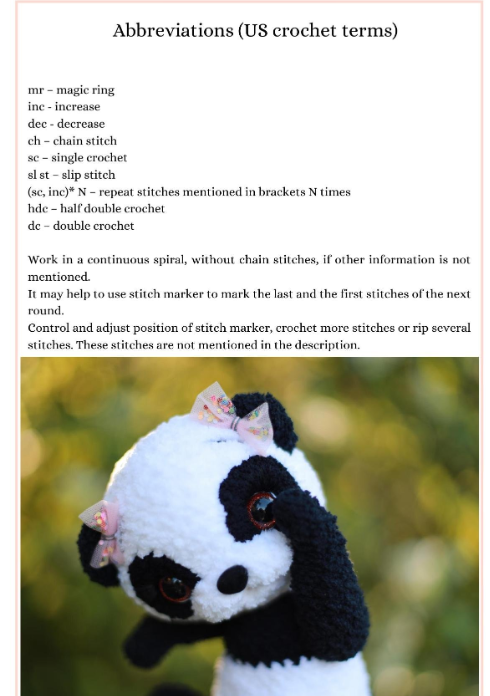
Abbreviations Used in This Crochet Baby Gifts Free Pattern (US Terms)
- mr — magic ring
- inc — increase
- dec — decrease
- ch — chain stitch
- sc — single crochet
- sl st — slip stitch
- (sc, inc)* N — repeat stitches mentioned in brackets N times
- hdc — half double crochet
- dc — double crochet
Work in a continuous spiral, without chain stitches, unless otherwise mentioned in this crochet baby gifts free pattern. It may help to use a stitch marker to mark the last and first stitches of the next round. Control and adjust the position of the stitch marker, crochet more stitches or rip several stitches if these are not mentioned in the description.
Full Written Pattern — Crochet Baby Gifts Free Pattern (Panda Amigurumi)
Here is the complete crochet baby gifts free pattern, written round by round with photo references for every single part — legs, arms, body, head, tail, ears, muzzle, sculpting, and finishing. Follow each section of this crochet baby gifts free pattern carefully and check your stitch counts at the end of every round.
Cotter Pin Joint
Follow these steps: place washer under head of pin, then place disk. If you use plastic disks do not use washers. Insert cotter pin joint. No stuffing between item and joint.
To add arms and legs — insert pin into body, place disk and washer on pin, twist stripes in different sides.
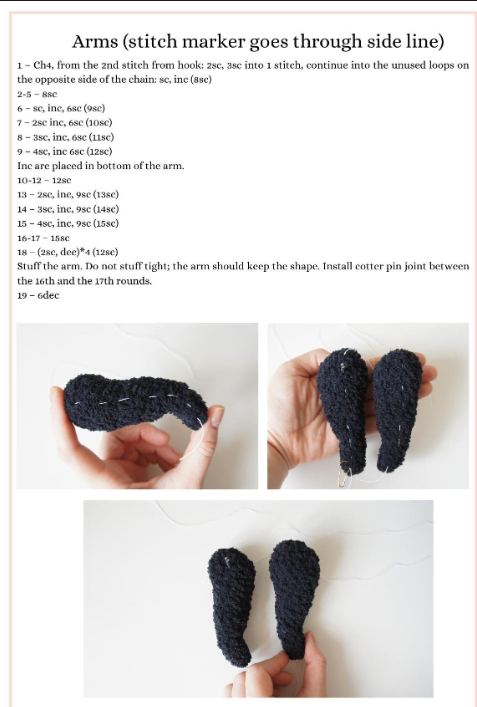
Mobile Head Joint
1. Connect 2 pins — wide 1 pin as pictured;
2. Place disk and washer above 1 pin;
3. Using round pliers twist stripes;
4. Finished pin joint install into unfinished body. Pull or sew hole.
5. Insert pin without disk into head, place disk and washer and twist stripes of 2nd pin.
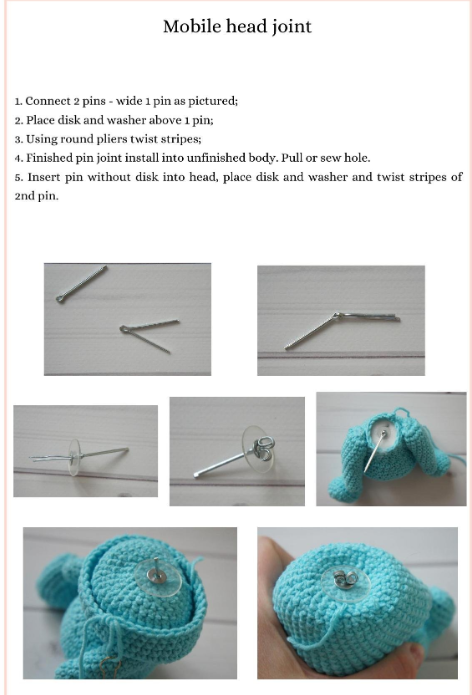
Legs (Make 2) — stitch marker goes through the center of back part
1 — Ch6, from the 2nd stitch from hook: inc, 3sc, 3sc into 1 stitch, continue into the unused loops on the opposite side of the chain: 4sc (12sc)
2 — inc, 3sc, 3inc, 3sc, 2inc (18sc)
3-5 — 18sc
6 — 4sc, 5hdc dec, 4sc (13sc)
7-8 — 13sc
9 — 6sc, inc, 6sc (14sc)
10 — 6sc, 2inc, 6sc (16sc)
11 — 7sc, 2inc, 7sc (18sc)
12 — 8sc, 2inc, 8sc (20sc)
13-14 — 20sc
15 — (2sc, dec)*5 (15sc)
16 — (3sc, dec)*3 (12sc)
Stuff the leg. Install cotter pin joint between the 14th and 15th rounds
17 — 6dec
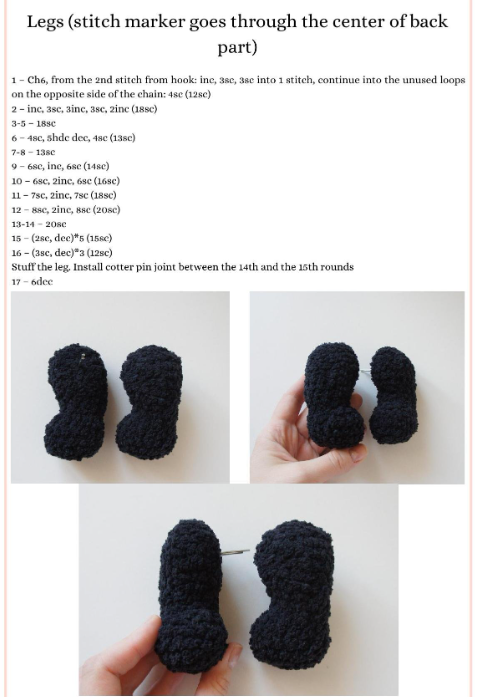
Arms (Make 2) — stitch marker goes through side line
1 — Ch4, from the 2nd stitch from hook: 2sc, 3sc into 1 stitch, continue into the unused loops on the opposite side of the chain: sc, inc (8sc)
2-5 — 8sc
6 — sc, inc, 6sc (9sc)
7 — 2sc inc, 6sc (10sc)
8 — 3sc, inc, 6sc (11sc)
9 — 4sc, inc 6sc (12sc)
Inc are placed in bottom of the arm.
10-12 — 12sc
13 — 2sc, inc, 9sc (13sc)
14 — 3sc, inc, 9sc (14sc)
15 — 4sc, inc, 9sc (15sc)
16-17 — 15sc
18 — (2sc, dec)*4 (12sc)
Stuff the arm. Do not stuff tight; the arm should keep the shape. Install cotter pin joint between the 16th and the 17th rounds.
19 — 6dec
Body — stitch marker goes through the center of the back
White yarn color
1 — Start 6sc in a mr
2 — 6inc (12sc)
3 — (sc, inc)*6 (18sc)
4 — (2sc, inc)*6 (24sc)
5 — (3sc, inc)*6 (30sc)
6 — (4sc, inc)*6 (36sc)
7 — (8sc, inc)*4 (40sc)
8 — 10sc, place secondary stitch marker, 20sc, place secondary stitch marker, 10sc (40sc)
9-13 — 40sc
Install the legs in the 8th round, in the places where secondary markers are placed.
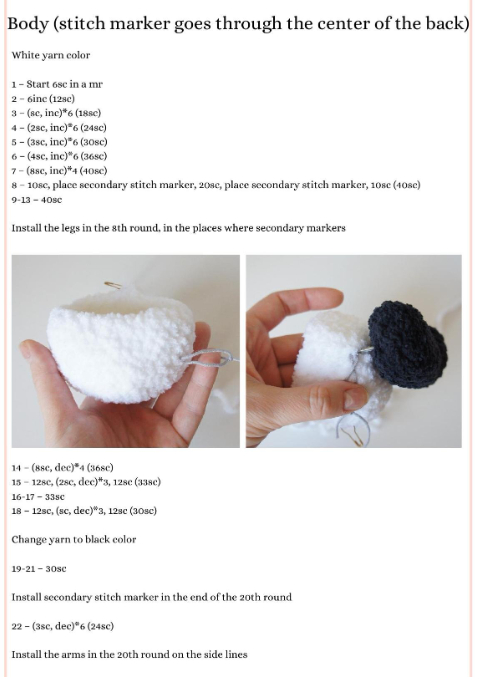
14 — (8sc, dec)*4 (36sc)
15 — 12sc, (2sc, dec)*3, 12sc (33sc)
16-17 — 33sc
18 — 12sc, (sc, dec)*3, 12sc (30sc)
Change yarn to black color
19-21 — 30sc
Install secondary stitch marker in the end of the 20th round
22 — (3sc, dec)*6 (24sc)
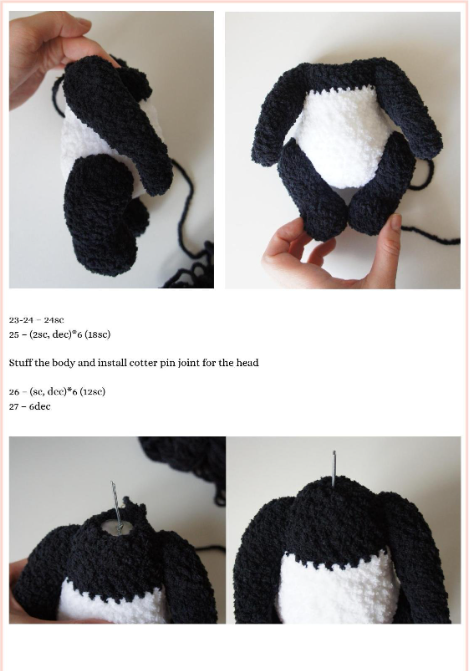
Install the arms in the 20th round on the side lines.
23-24 — 24sc
25 — (2sc, dec)*6 (18sc)
Stuff the body and install cotter pin joint for the head.
26 — (sc, dec)*6 (12sc)
27 — 6dec
Tail
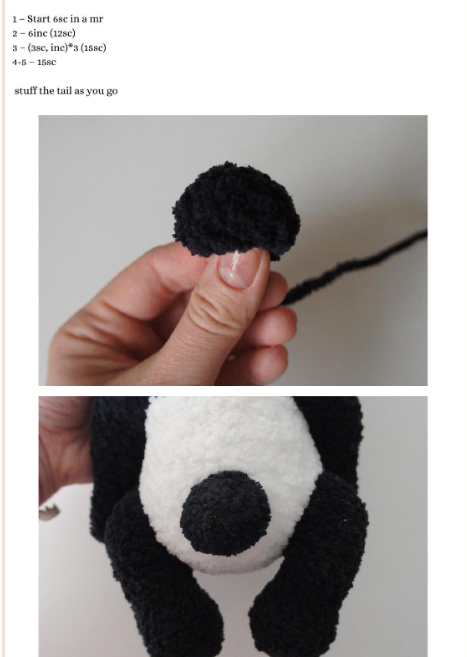
1 — Start 6sc in a mr
2 — 6inc (12sc)
3 — (3sc, inc)*3 (15sc)
4-5 — 15sc
Stuff the tail as you go.
Head — stitch marker goes through the sideline of the muzzle
1 — Ch5, from the 2nd stitch from hook: inc, 2sc, 4sc into 1 stitch, continue into the unused loops on the opposite side of the chain: 2sc, inc (12sc)
2 — inc, 4sc, 2inc, 4sc, inc (16sc)
3 — sc, inc, 4sc, (sc, inc)*2, 4sc, inc, sc (20sc)
4 — 2sc, inc, 4sc, inc, (2sc)*2, 4sc, inc, 2sc (24sc)
5-6 — 24sc
7 — 10sl st, 14sc (24sc)
8 — 3sc, 6inc, 15sc (30sc)
9 — 6sc, 3inc, secondary stitch marker, 3inc, 13sc (31sc)
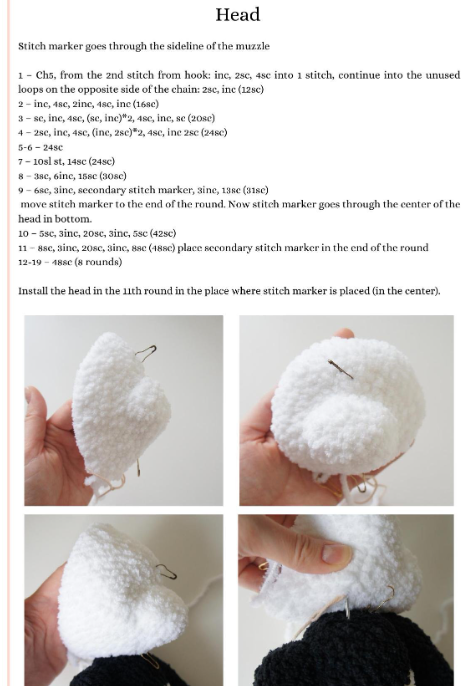
move stitch marker to the end of the round. Now stitch marker goes through the center of the head in bottom.
10 — 5sc, 3inc, 20sc, 3inc, 5sc (42sc)
11 — 8sc, 3inc, 20sc, 3inc, 8sc (48sc) place secondary stitch marker in the end of the round
12-19 — 48sc (8 rounds)
Install the head in the 11th round in the place where the stitch marker is placed (in the center).
20 — (6sc, dec)*6 (42sc)
21 — (5sc, dec)*6 (36sc)
22 — (4sc, dec)*6 (30sc)
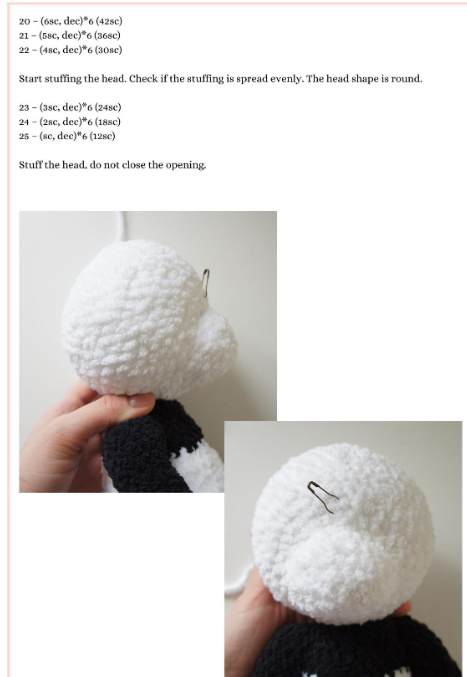
Start stuffing the head. Check if the stuffing is spread evenly. The head shape is round.
23 — (3sc, dec)*6 (24sc)
24 — (2sc, dec)*6 (18sc)
25 — (sc, dec)*6 (12sc)
Stuff the head, do not close the opening.
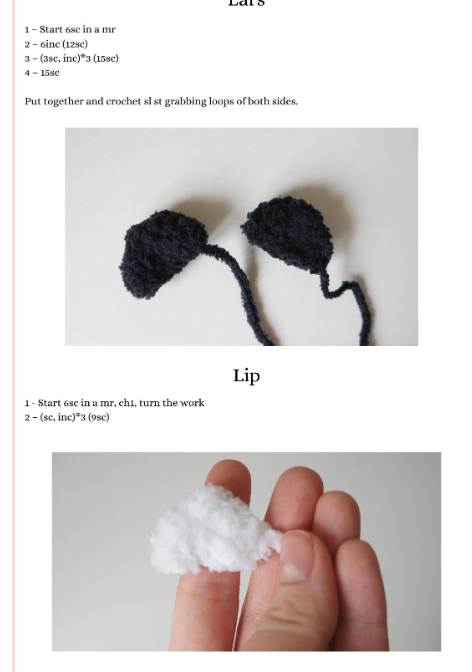
Ears (Make 2) and Lip
Ears:
1 — Start 6sc in a mr
2 — 6inc (12sc)
3 — (3sc, inc)*3 (15sc)
4 — 15sc
Put together and crochet sl st grabbing loops of both sides.
Lip:
1 — Start 6sc in a mr, ch1, turn the work
2 — (sc, inc)*3 (9sc)
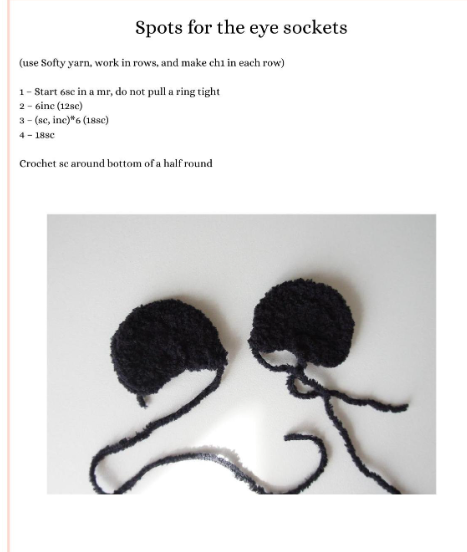
Spots for the Eye Sockets
(use Softy yarn, work in rows, and make ch1 in each row)
1 — Start 6sc in a mr, do not pull a ring tight
2 — 6inc (12sc)
3 — (sc, inc)*6 (18sc)
4 — 18sc
Crochet sc around bottom of a half round.
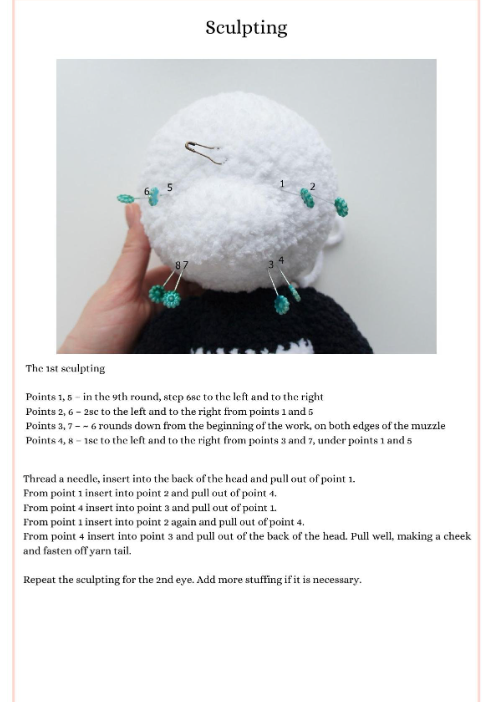
Sculpting the Face
The 1st sculpting:
Points 1, 5 — in the 9th round, step 6sc to the left and to the right
Points 2, 6 — 2sc to the left and to the right from points 1 and 5
Points 3, 7 — 6 rounds down from the beginning of the work, on both edges of the muzzle
Points 4, 8 — 1sc to the left and to the right from points 3 and 7, under points 1 and 5
Thread a needle, insert into the back of the head and pull out of point 1.
From point 1 insert into point 2 and pull out of point 4.
From point 4 insert into point 3 and pull out of point 1.
From point 1 insert into point 2 again and pull out of point 4.
From point 4 insert into point 3 and pull out of the back of the head. Pull well, making a cheek and fasten off yarn tail.
Repeat the sculpting for the 2nd eye. Add more stuffing if necessary.
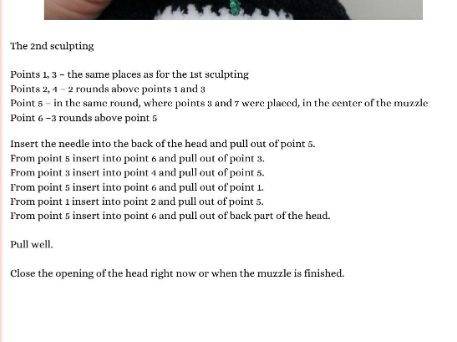
The 2nd sculpting:
Points 1, 3 — the same places as for the 1st sculpting
Points 2, 4 — 2 rounds above points 1 and 3
Point 5 — in the same round, where points 3 and 7 were placed, in the center of the muzzle
Point 6 — 3 rounds above point 5
Insert the needle into the back of the head and pull out of point 5.
From point 5 insert into point 6 and pull out of point 3.
From point 3 insert into point 4 and pull out of point 5.
From point 5 insert into point 6 and pull out of point 1.
From point 1 insert into point 2 and pull out of point 5.
From point 5 insert into point 6 and pull out of back part of the head.
Pull well. Close the opening of the head right now or when the muzzle is finished.
Muzzle Decoration
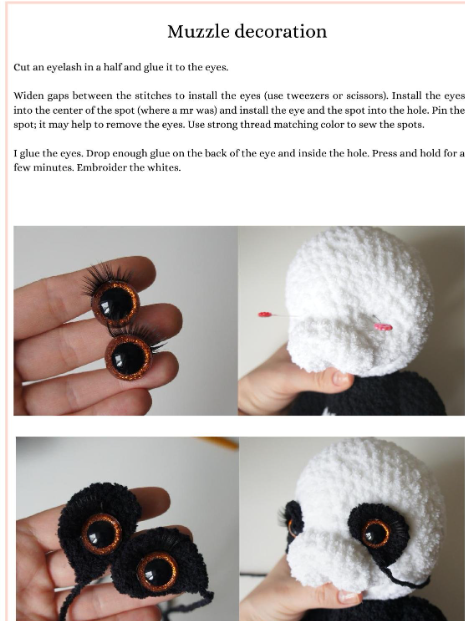
Cut an eyelash in a half and glue it to the eyes.
Widen gaps between the stitches to install the eyes (use tweezers or scissors). Install the eyes into the center of the spot (where a mr was) and install the eye and the spot into the hole. Pin the spot; it may help to remove the eyes. Use strong thread matching color to sew the spots.
Glue the eyes. Drop enough glue on the back of the eye and inside the hole. Press and hold for a few minutes. Embroider the whites.
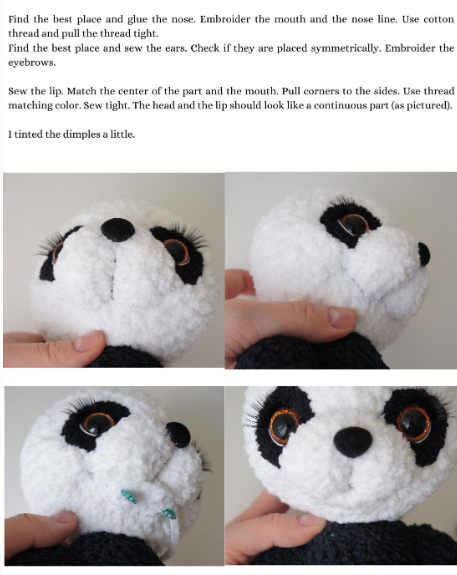
Find the best place and glue the nose. Embroider the mouth and the nose line. Use cotton thread and pull the thread tight.
Find the best place and sew the ears. Check if they are placed symmetrically. Embroider the eyebrows.
Sew the lip. Match the center of the part and the mouth. Pull corners to the sides. Use thread matching color. Sew tight. The head and the lip should look like a continuous part (as pictured).
Tint the dimples a little for a soft, blushed finish.
Headband (Work in Rows, Making Chain Stitches)
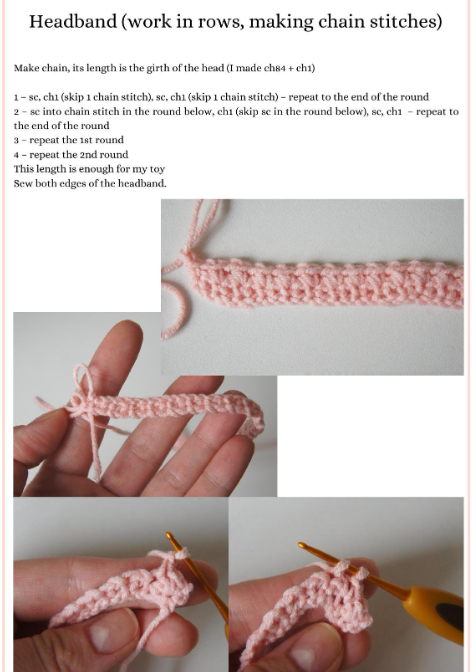
Make a chain, its length is the girth of the head (the sample used ch84 + ch1).
1 — sc, ch1 (skip 1 chain stitch), sc, ch1 (skip 1 chain stitch) — repeat to the end of the round
2 — sc into chain stitch in the round below, ch1 (skip sc in the round below), sc, ch1 — repeat to the end of the round
3 — repeat the 1st round
4 — repeat the 2nd round
This length is enough for this toy. Sew both edges of the headband.
Congratulations — you’ve just completed this entire crochet baby gifts free pattern from start to finish! This panda amigurumi, with its posable joints, sculpted face, and sweet little headband, makes one of the most heartfelt crochet baby gifts free pattern projects you can give to a new parent or add to a nursery shelf.
Tips for Getting This Crochet Baby Gifts Free Pattern Just Right
- Always place a stitch marker at the start of each round — this is essential for keeping this crochet baby gifts free pattern accurate from round to round.
- Stuff firmly but evenly so the joints move smoothly once your crochet baby gifts free pattern panda is fully assembled.
- Take your time with the face sculpting steps — this is what gives this crochet baby gifts free pattern its signature expressive, heirloom-quality look.
- If this is your first amigurumi with joints, practice the cotter pin joint on scrap fabric before attaching it to your crochet baby gifts free pattern panda.
- Use safe, securely glued and sewn eyes since this crochet baby gifts free pattern panda may end up as a keepsake handled by little hands later on.
Why Handmade Crochet Baby Gifts Free Pattern Projects Make the Best Gifts
Every stitch in a crochet baby gifts free pattern project carries intention, time, and love — something that simply cannot be replicated by a mass-produced toy. Whether you’re making this for a baby shower, a gender reveal party, a nursery centerpiece, or a first birthday gift, this crochet baby gifts free pattern panda will become a cherished keepsake that grows with the child. Many crocheters searching for crochet baby gifts free pattern ideas choose amigurumi specifically because it combines a creative hobby with a genuinely useful, sentimental gift.
Frequently Asked Questions About This Crochet Baby Gifts Free Pattern
Is this crochet baby gifts free pattern suitable for beginners?
This crochet baby gifts free pattern is best suited for intermediate crocheters due to the jointed limbs and face sculpting steps, but a patient beginner who has made a few amigurumi before can absolutely complete it with the detailed photos provided.
How long does this crochet baby gifts free pattern take to complete?
Most makers spend several hours across a few sessions to finish this crochet baby gifts free pattern, since it includes multiple pieces (body, arms, legs, head, ears, tail, and headband) plus the detailed sculpting and finishing process.
Can I make this crochet baby gifts free pattern without cotter pin joints?
Yes — if you don’t have cotter pins on hand, you can sew the arms and legs directly onto the body of this crochet baby gifts free pattern panda, though you will lose the posable, mobile feature of the joints.
Final Thoughts on This Crochet Baby Gifts Free Pattern
This panda tutorial is one of the sweetest crochet baby gifts free pattern projects you can add to your handmade gift rotation. From the jointed limbs to the sculpted cheeks and the soft pink headband, every detail of this crochet baby gifts free pattern was designed to create a truly special keepsake. Save this crochet baby gifts free pattern post, share it with a crochet-loving friend who has a baby shower coming up, and let us know in the comments how your panda turned out!