

A crochet turtle with flowers on shell turns a familiar amigurumi shape into a tiny garden. A rounded cream head peeks out from a rose-colored shell, while rolled roses, layered blossoms, and green leaves cover the top. The finished pair in the reference photo includes a small gray-shell turtle and a larger pink-shell turtle—two charming versions of the same floral idea.
This crochet turtle with flowers on shell guide brings the supplied pattern pages together in readable text. You will find the small turtle, large turtle, flower variations, leaves, assembly notes, and all 12 project images. Choose the size first, then keep the matching flower section beside your work.
Pattern accuracy note: These instructions are an editorial transcription of the supplied pages, not an independently crocheted or tested design. Several printed counts conflict with their stitch sequences, particularly in the large head and legs. Those conflicts and clearly labeled, untested suggestions appear beside the affected rounds. Some edging and petal placements still require the reference photos or clarification from the original designer.
- Choose your turtle size
- Materials and abbreviations
- Small turtle pattern
- Small turtle flowers and leaves
- Large turtle pattern
- Large turtle flowers and leaves
- Assembly and finishing
- Questions and troubleshooting
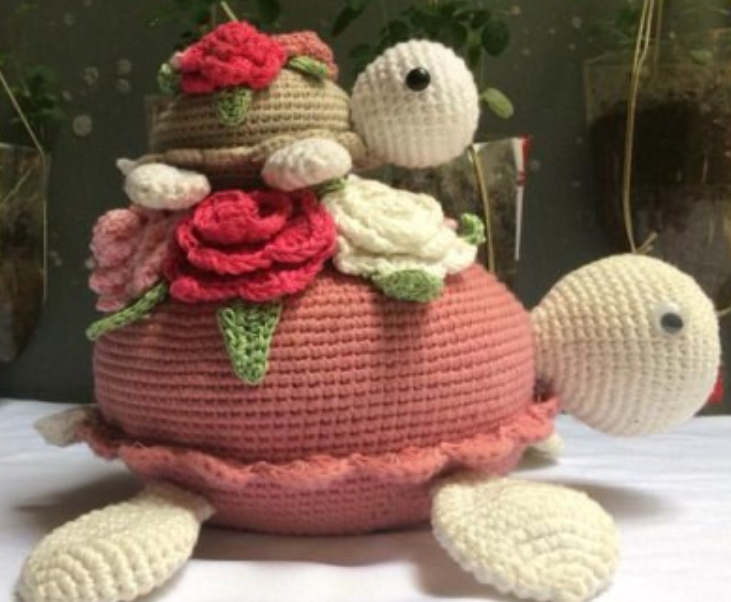
Choose your flower turtle size
Before starting a crochet turtle with flowers on shell, decide how much shaping and assembly you want to tackle. The small shell reaches 64 stitches around; the large shell reaches 144. The flower arrangements also differ. The larger turtle uses rolled roses, layered flowers, a smaller rose, and seven leaves.
| Version | Description | Planning note |
|---|---|---|
| Small | Light gray shell; white head, four legs, and tail | 64-stitch widest shell round |
| Large | Rouge-pink shell; white head, four legs, and tail | 144-stitch widest shell round |
| Skill needs | Round shaping, increases, decreases, flower stitches, and sewing | Not a no-sew project |
| Finished dimensions | No reliable measurements or gauge appear in the supplied pages | Size depends on yarn and tension |
For a first attempt, the smaller shell gives you fewer stitches to track. That does not make the full project a beginner-only pattern: the flowers, shell edging, and finishing still require attention. Practice a rose and one leaf before making all the decorative pieces.
Materials for your floral turtle
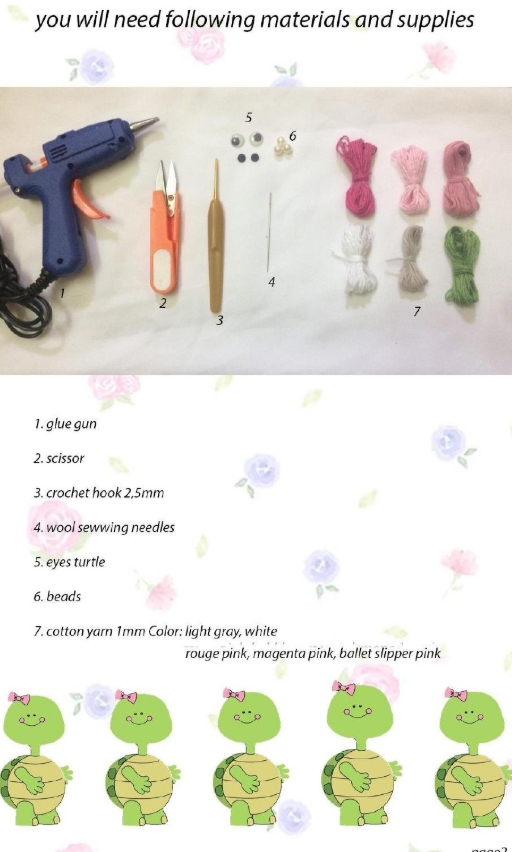
The supplied materials page for this crochet turtle with flowers on shell lists a 2.5-mm crochet hook and cotton yarn described as “1 mm.” Yarn diameter is not a standardized weight label, so use a sample to check the fabric instead of assuming any cotton yarn will produce the pictured size.
- 2.5-mm crochet hook.
- Cotton yarn in light gray, white, rouge pink, magenta pink, ballet-slipper pink, and green for leaves.
- Wool or yarn sewing needles and scissors.
- Eyes suitable for the finished turtle; no eye diameter is specified.
- Optional beads for flower centers, shown in the large-turtle photos.
- A glue gun appears in the source materials image; the assembly instructions primarily describe sewing.
- Suggested practical additions: a stitch marker and fiberfill. Stuffing is mentioned in the source tips, but no quantity is supplied.
The small-turtle heading says to hold two strands together. The large-turtle heading also refers to two strands, although it says gray while the shell instruction says rouge pink and the finished photo shows pink. Use the shell color indicated for the version you are making. Flower sections state when one or two strands are used; do not assume every decoration is doubled.
Make a small tension sample before committing to a crochet turtle with flowers on shell. Holding two strands together changes fabric thickness and yarn use. Check that the resulting fabric holds stuffing neatly, and keep the same yarn combination for matching pieces.
Abbreviations and source shorthand
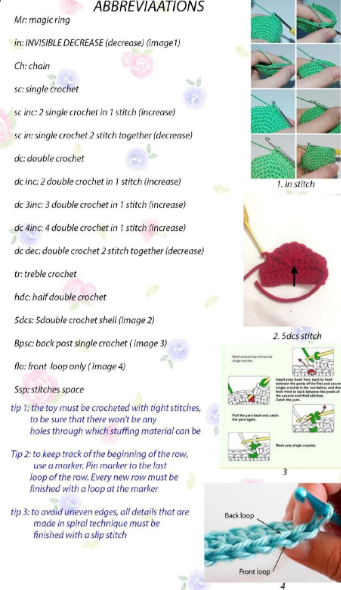
For this crochet turtle with flowers on shell, the key distinction is inc versus dec. The source uses “sc inc” for an increase and “sc in” for a decrease. This article writes “dec” for the latter to make the rounds easier to follow. All stitch names below use US terminology.
- MR: magic ring. ch: chain. sc: single crochet. dc: double crochet. hdc: half double crochet. tr: treble crochet.
- inc: 2 sc in one stitch. dec: single-crochet decrease over two stitches; the source also illustrates an invisible decrease.
- dc inc / dc 3inc / dc 4inc: 2 / 3 / 4 dc in the same stitch. These are groups in one stitch, not dc-together decreases.
- dc dec: double-crochet decrease. A dc cluster is distinct from several complete dc in one stitch.
- 5dcs: five-double-crochet shell, as named on the source abbreviation page.
- bpsc: back-post single crochet. Do not silently replace it with back-loop-only sc.
- FLO: front loop only. sl st: slip stitch. Parentheses followed by × n mean repeat the sequence n times.
- The source defines “ssp” as a stitch space. In the edging and rose instructions it appears to indicate a skipped stitch or space, but the exact intended placement is not fully explained. Interpretations are labeled below.
The source recommends tight stitches, a marker to track the round, and a slip stitch to finish pieces worked in a spiral. Keep a marker in a consistent position; counting before the next shaping round prevents a small mistake from affecting the entire shell.
Small turtle: shell and underside
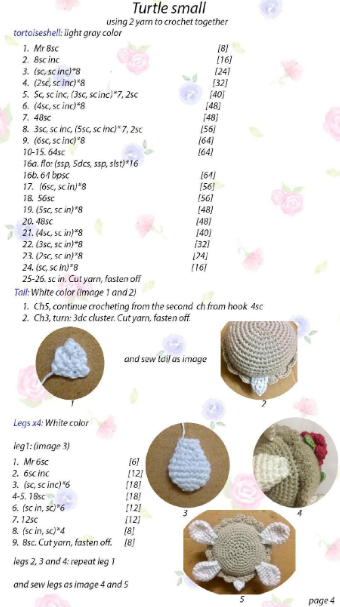
Start the small crochet turtle with flowers on shell with the light gray shell and two strands held together, following the source heading. The shell and underside are shaped as one piece. Keep the decorative edge separate from the numbered decrease rounds so you do not accidentally add or remove a body round.
| Round | Written instructions — US terms | Stitches |
|---|---|---|
| 1 | 8 sc in MR | 8 |
| 2 | inc × 8 | 16 |
| 3 | (sc 1, inc) × 8 | 24 |
| 4 | (sc 2, inc) × 8 | 32 |
| 5 | sc 1, inc, (sc 3, inc) × 7, sc 2 | 40 |
| 6 | (sc 4, inc) × 8 | 48 |
| 7 | sc around | 48 |
| 8 | sc 3, inc, (sc 5, inc) × 7, sc 2 | 56 |
| 9 | (sc 6, inc) × 8 | 64 |
| 10–15 | sc around for six rounds | 64 |
| 16a | FLO: source sequence “(ssp, 5dcs, ssp, sl st) × 16”; see edging note | Not stated |
| 16b | 64 bpsc, as printed in the source | 64 |
| 17 | (sc 6, dec) × 8 | 56 |
| 18 | sc around | 56 |
| 19 | (sc 5, dec) × 8 | 48 |
| 20 | sc around | 48 |
| 21 | (sc 4, dec) × 8 | 40 |
| 22 | (sc 3, dec) × 8 | 32 |
| 23 | (sc 2, dec) × 8 | 24 |
| 24 | (sc 1, dec) × 8 | 16 |
| 25–26 | Source says “sc in” for both rounds, then cut yarn and fasten off | Not stated |
Edging interpretation, untested: a repeat of skip 1 stitch, 5 dc in the next stitch, skip 1 stitch, sl st in the next stitch consumes four base stitches; repeating it 16 times fits a 64-stitch rim. This is an arithmetic interpretation of the unclear “ssp” wording, not a verified designer correction. Round 16b is explicitly bpsc in the source; check the reference for placement before continuing underneath the edging.
Final decreases, inferred: if rounds 25–26 mean decrease around on each round, 16 stitches become 8, then 4. Those totals are inferred; they are not printed in the source. Add stuffing while you can reach the inside, avoid overfilling, and close the remaining opening securely.
Small turtle: tail and four legs
The small crochet turtle with flowers on shell has four matching white legs and a short white tail. Leave sewing tails where possible so you can assemble the pieces without adding unnecessary knots. Keep the unstuffed edges easy to flatten against the underside of the shell.
Tail: ch 5. Starting in the second chain from the hook, work 4 sc. Ch 3 and turn, then work a 3-dc cluster as directed in the source. Cut yarn and fasten off. The page does not expand the cluster’s insertion points, so refer to the triangular tail photo when interpreting the finish. Sew the tail at the rear.
| Round | Written instructions — US terms | Stitches |
|---|---|---|
| 1 | 6 sc in MR | 6 |
| 2 | inc × 6 | 12 |
| 3 | (sc 1, inc) × 6 | 18 |
| 4–5 | sc around for two rounds | 18 |
| 6 | (dec, sc 1) × 6 | 12 |
| 7 | sc around | 12 |
| 8 | (dec, sc 1) × 4 | 8 |
| 9 | sc around; cut yarn and fasten off | 8 |
Make the leg instructions four times. Sew the legs around the lower shell as shown in the reference images, with two on either side and the tail between the rear pair. Pin them first to check that the turtle rests evenly.
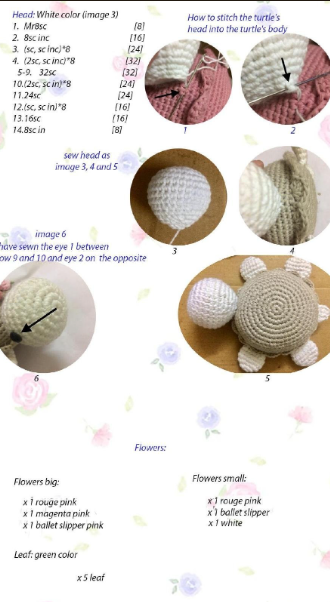
Small turtle: head and eyes
The rounded white head balances the floral shell of a crochet turtle with flowers on shell. Crochet it separately, then check the face orientation before attaching it. The source positions one eye between rounds 9 and 10, with the other on the opposite side; no measured stitch spacing is supplied.
| Round | Written instructions — US terms | Stitches |
|---|---|---|
| 1 | 8 sc in MR | 8 |
| 2 | inc × 8 | 16 |
| 3 | (sc 1, inc) × 8 | 24 |
| 4 | (sc 2, inc) × 8 | 32 |
| 5–9 | sc around for five rounds | 32 |
| 10 | (sc 2, dec) × 8 | 24 |
| 11 | sc around | 24 |
| 12 | (sc 1, dec) × 8 | 16 |
| 13 | sc around | 16 |
| 14 | dec × 8 | 8 |
The photos show sewing through the head’s attachment edge and the turtle body. If you use eyes with backing washers, fit them while the inside is accessible. Add appropriate stuffing before closing and attaching the head; that timing is practical assembly guidance because the source does not give a detailed stuffing sequence.
Small turtle: rolled flowers and green leaves
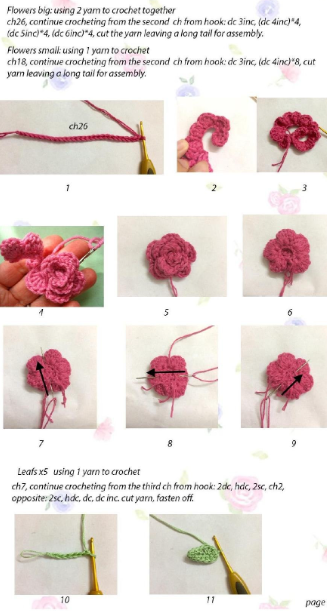
For the small crochet turtle with flowers on shell, the source lists six flowers: three larger rolled flowers and three smaller ones. Make one large flower each in rouge pink, magenta pink, and ballet-slipper pink. Make one small flower each in rouge pink, ballet-slipper pink, and white. Add five green leaves.
Larger rolled flowers for the small turtle
Hold two strands together. Ch 26. Starting in the second chain from the hook, the printed sequence is: dc 3inc, (dc 4inc) × 4, (dc 5inc) × 4, (dc 6inc) × 4. Cut yarn, leaving a long assembly tail. The progression makes increasingly full petal groups. Roll the strip into a rose and sew through its underside as shown in the photos.
Source gap: that sequence specifies 13 grouped stitch placements but the foundation has 25 available chains after the starting chain. The source does not clearly say which chains to skip or how all chains are used. Preserve the reference and consult the original designer before relying on an exact written placement. Do not substitute an invented skip sequence and describe it as tested.
Smaller rolled flowers for the small turtle
Use one strand. Ch 18. Starting in the second chain from the hook, work dc 3inc, then (dc 4inc) × 8. Leave a long tail, roll, and sew the flower as shown. Here, too, nine groups are listed for 17 available foundation chains; intervening placement is not fully stated. The photo sequence remains important.
Five small leaves
Use one strand of green yarn. Ch 7. Starting in the third chain from the hook: 2 dc, hdc, 2 sc, ch 2. Work along the opposite side: 2 sc, hdc, dc, dc inc. Cut yarn and fasten off. The source does not give a final stitch count. Follow the leaf photos for the chain-tip turn and sew the leaves under the flowers.
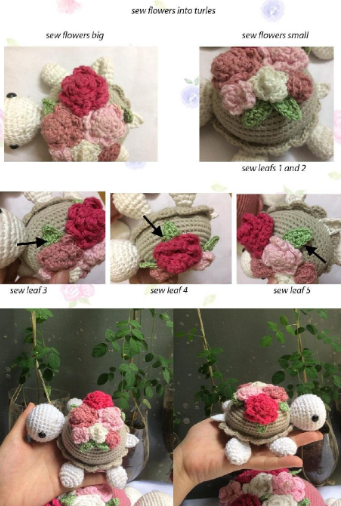
Arrange the flowers on your small crochet turtle with flowers on shell before securing them. Put the larger blooms where they can sit naturally on the dome, then tuck smaller blooms and leaves into gaps. Pinning the entire arrangement first helps keep the head and legs visible rather than hiding them under petals.
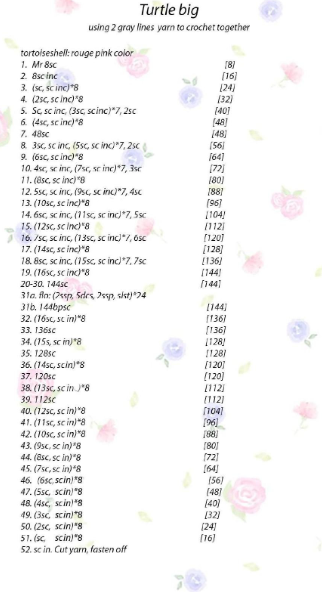
Large turtle: pink shell and underside
For the large crochet turtle with flowers on shell, use the rouge-pink shell color shown in the completed reference. The top widens to 144 stitches, stays at that width for eleven rounds, then receives its decorative rim and decreasing underside. Mark the start of every round and keep a written count after each increase.
| Round | Written instructions — US terms | Stitches |
|---|---|---|
| 1 | 8 sc in MR | 8 |
| 2 | inc × 8 | 16 |
| 3 | (sc 1, inc) × 8 | 24 |
| 4 | (sc 2, inc) × 8 | 32 |
| 5 | sc 1, inc, (sc 3, inc) × 7, sc 2 | 40 |
| 6 | (sc 4, inc) × 8 | 48 |
| 7 | sc around | 48 |
| 8 | sc 3, inc, (sc 5, inc) × 7, sc 2 | 56 |
| 9 | (sc 6, inc) × 8 | 64 |
| 10 | sc 4, inc, (sc 7, inc) × 7, sc 3 | 72 |
| 11 | (sc 8, inc) × 8 | 80 |
| 12 | sc 5, inc, (sc 9, inc) × 7, sc 4 | 88 |
| 13 | (sc 10, inc) × 8 | 96 |
| 14 | sc 6, inc, (sc 11, inc) × 7, sc 5 | 104 |
| 15 | (sc 12, inc) × 8 | 112 |
| 16 | sc 7, inc, (sc 13, inc) × 7, sc 6 | 120 |
| 17 | (sc 14, inc) × 8 | 128 |
| 18 | sc 8, inc, (sc 15, inc) × 7, sc 7 | 136 |
| 19 | (sc 16, inc) × 8 | 144 |
| 20–30 | sc around for eleven rounds | 144 |
| 31a | FLO: source sequence “(2ssp, 5dcs, 2ssp, sl st) × 24”; see note | Not stated |
| 31b | 144 bpsc, as printed | 144 |
| 32 | (sc 16, dec) × 8 | 136 |
| 33 | sc around | 136 |
| 34 | (sc 15, dec) × 8 | 128 |
| 35 | sc around | 128 |
| 36 | (sc 14, dec) × 8 | 120 |
| 37 | sc around | 120 |
| 38 | (sc 13, dec) × 8 | 112 |
| 39 | sc around | 112 |
| 40 | (sc 12, dec) × 8 | 104 |
| 41 | (sc 11, dec) × 8 | 96 |
| 42 | (sc 10, dec) × 8 | 88 |
| 43 | (sc 9, dec) × 8 | 80 |
| 44 | (sc 8, dec) × 8 | 72 |
| 45 | (sc 7, dec) × 8 | 64 |
| 46 | (sc 6, dec) × 8 | 56 |
| 47 | (sc 5, dec) × 8 | 48 |
| 48 | (sc 4, dec) × 8 | 40 |
| 49 | (sc 3, dec) × 8 | 32 |
| 50 | (sc 2, dec) × 8 | 24 |
| 51 | (sc 1, dec) × 8 | 16 |
| 52 | Source says “sc in”; cut yarn and fasten off | Not stated |
Large-rim interpretation, untested: skip 2 stitches, work 5 dc in the next, skip 2, and sl st in the next would consume six base stitches per repeat; 24 repeats fit 144 stitches. This interpretation is consistent with the counts but does not settle the source’s ambiguous “ssp” definition. The final “sc in” is reasonably interpreted as decrease around, taking 16 stitches to 8; that last count is inferred.
Large turtle: tail, legs, and head
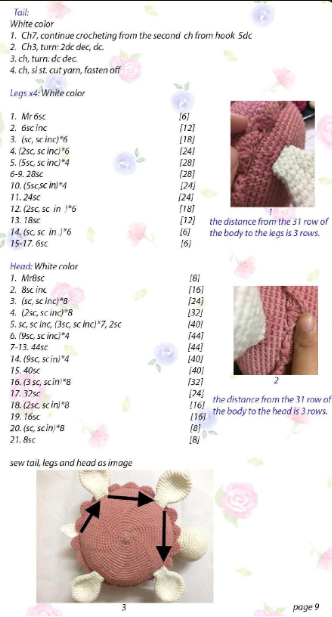
The large crochet turtle with flowers on shell uses white appendages. Several printed counts in this section do not match the stitch text, so the tables below preserve the source and flag the conflicts. Treat the suggested routes afterward as arithmetic repairs to sample first, not a claim of a tested replacement pattern.
Large tail: source wording
- Ch 7; starting in the second chain from the hook, work 5 dc.
- Ch 3, turn: 2 dc decreases, then 1 dc.
- Ch 1, turn: dc decrease.
- Ch 1, sl st, cut yarn and fasten off.
The tail text leaves a foundation chain unaccounted for and does not fully explain how the next decrease row uses the previous row. Refer to the tail shape in the source assembly photo or seek the original designer’s clarification rather than assuming a final count.
Large legs: make four; printed directions
| Round | Written instructions — US terms | Stitches |
|---|---|---|
| 1 | 6 sc in MR | 6 |
| 2 | inc × 6 | 12 |
| 3 | (sc 1, inc) × 6 | 18 |
| 4 | (sc 2, inc) × 6 | 24 |
| 5 | (sc 5, inc) × 4 | 28 |
| 6–9 | sc around for four rounds | 28 |
| 10 | (sc 5, dec) × 4 | 24 |
| 11 | sc around | 24 |
| 12 | (sc 2, dec) × 6 | 18 |
| 13 | 18 sc; printed total is 12 | Conflict |
| 14 | (sc 1, dec) × 6; printed total is 6 | Conflict |
| 15–17 | 6 sc each round as printed | 6 |
Possible count-consistent leg repair, not tested: after round 12 has 18 stitches, use (sc 1, dec) × 6 for round 13 to get 12; use dec × 6 for round 14 to get 6; then work 6 sc for rounds 15–17. This matches the decreasing totals printed in the right column, but it changes the printed round-13 and round-14 stitch text. Sample it before making all four legs.
Large head: printed directions
| Round | Written instructions — US terms | Stitches |
|---|---|---|
| 1 | 8 sc in MR | 8 |
| 2 | inc × 8 | 16 |
| 3 | (sc 1, inc) × 8 | 24 |
| 4 | (sc 2, inc) × 8 | 32 |
| 5 | sc 1, inc, (sc 3, inc) × 7, sc 2 | 40 |
| 6 | (sc 9, inc) × 4 | 44 |
| 7–13 | sc around for seven rounds | 44 |
| 14 | (sc 9, dec) × 4 | 40 |
| 15 | sc around | 40 |
| 16 | (sc 3, dec) × 8 | 32 |
| 17 | 32 sc; printed total is 24 | Conflict |
| 18 | (sc 2, dec) × 8; printed total is 16 | Conflict |
| 19 | 16 sc as printed | 16 |
| 20 | (sc 1, dec) × 8; printed total is 8 | Conflict |
| 21 | 8 sc as printed | 8 |
Possible count-consistent head repair, not tested: after round 16 has 32 stitches, use (sc 2, dec) × 8 for round 17 to get 24; use (sc 1, dec) × 8 for round 18 to get 16; sc 16 for round 19; dec × 8 for round 20 to get 8; and sc 8 for round 21. This follows the printed count progression while correcting incompatible stitch sequences.
The large-turtle attachment photos say the head and legs are three rows away from body round 31. Pin the pieces relative to that rim, then compare the underside arrangement with the arrows in the reference before sewing. No separate large-eye spacing is supplied; check symmetry against the finished photograph.
Large turtle: a shell full of roses
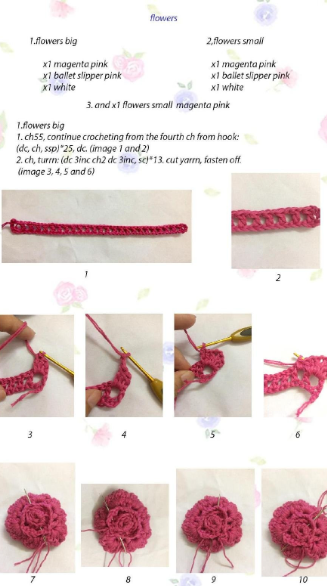
The large crochet turtle with flowers on shell carries seven flowers in the supplied arrangement: three large roses, three layered flowers, and one additional small magenta flower made using the small-turtle flower method. Use one large rose and one layered flower each in magenta pink, ballet-slipper pink, and white.
Three large rolled roses
Ch 55. Starting in the fourth chain from the hook, the source gives (dc, ch 1, ssp) × 25, then dc. Ch 1 and turn. Work (dc 3inc, ch 2, dc 3inc, sc) × 13. Cut yarn and fasten off. Roll the strip into a rose and sew through the underside repeatedly to hold the coil, as demonstrated in the photos.
The foundation photograph shows an open chain-space strip, but the “ssp” placement and the exact anchoring of the 13 petal repeats are not fully expanded in the text. Keep this photo guide beside the written sequence. “dc 3inc” means three complete dc in the same stitch or indicated placement, not a dc3tog decrease.
Three layered flowers
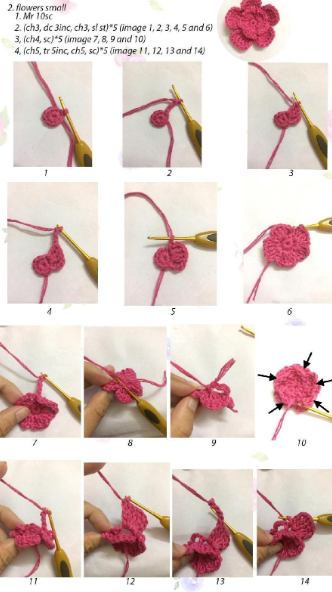
Layered petals give the crochet turtle with flowers on shell a fuller floral top than a single row of roses. These flowers begin in a magic ring, then add a second tier behind the first. The photos show the anchoring area more clearly than the short written directions, so use both together.
- Round 1: 10 sc in MR.
- Round 2: (ch 3, dc 3inc, ch 3, sl st) × 5. This forms the first five petals; the source does not fully label their stitch placement.
- Round 3: (ch 4, sc) × 5, working the linking arches behind the first petals as shown in the photographs.
- Round 4: (ch 5, tr 5inc, ch 5, sc) × 5. The source uses “tr 5inc,” interpreted here as five complete treble crochets into the indicated petal space. Check the photo for anchoring.
The five repeats suggest five outer petals around the five rear arches. The written source does not specify every insertion point, so do not regard that placement description as an independently tested technical correction. Leave tails for attaching the flower to the shell.
Seven larger green leaves and the extra flower
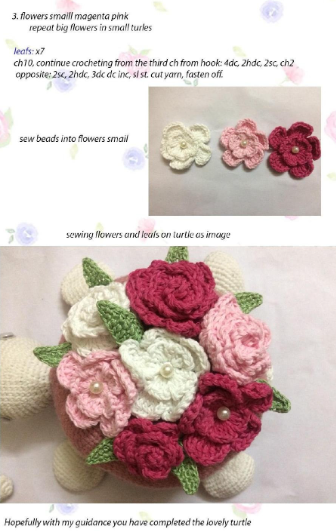
For the larger crochet turtle with flowers on shell, make seven green leaves. Ch 10. Starting in the third chain from the hook: 4 dc, 2 hdc, 2 sc, ch 2. Work on the opposite side: 2 sc, 2 hdc, 3 dc, dc inc. Sl st, cut yarn, and fasten off. Use the end-of-chain photographs and your leaf shape to check the turn.
Make one additional small magenta flower using the small rolled-flower method earlier in this guide, retaining its noted placement limitation. The final source page also shows beads sewn into the centers of the three layered flowers. Beads are a decorative option; they are not required for the crocheted flower structure.
Assembly: arrange the flowers before sewing
To assemble a crochet turtle with flowers on shell, finish the turtle base first, then lay the flowers on top without stitching them down immediately. Place the largest roses where they follow the dome, balance the lighter and darker colors, and tuck leaves beneath the outer petals. Check the arrangement from above and from the head end.
- Secure the head, four legs, and tail, using the matching size’s attachment photographs.
- Pin all flowers in position. Make sure the head and shell rim remain visible.
- Sew through the flower bases and shell stitches with multiple small passes; avoid flattening the petals with tight stitches across their tops.
- Tuck leaves into the spaces between blooms and stitch their bases securely.
- If adding beads for a display piece, attach them securely and check the thread ends.
- Hide all yarn tails, inspect the underside, and gently reshape the stuffed pieces.
For items intended for young children, omit beads and glue-on eyes; use securely embroidered features and an age-appropriate construction. The supplied photo pattern is not a toy-safety certification. A glue gun in the materials image is not a substitute for secure structural stitching.
Color ideas, finishing, and troubleshooting
You can personalize a crochet turtle with flowers on shell without changing the stitch shaping. Keep the shell in a quiet color so the petals stand out, then choose two or three flower shades with enough contrast. A pale shell with cream and pink blooms feels soft; a deeper shell lets ivory flowers become the focal point.
If the shell ripples unexpectedly before the decorative edge, recount increases. If stuffing shows between stitches, check your yarn-and-hook combination or reduce overfilling. If a rose falls open, reinforce the underside coil rather than pulling the outer petals together. If the turtle leans, reposition the legs before the seams are fully secured.
Care for your crochet turtle with flowers on shell according to the actual yarn and any attached embellishments. The source supplies no washing directions. A display piece with beads or glued details may need different care from a fully sewn, unembellished turtle. Include accurate care notes if giving it as a gift.
Frequently asked questions
Is this flower turtle suitable for a complete beginner?
A crochet turtle with flowers on shell combines familiar stitches with shaping, small decorative pieces, and assembly. Beginners who know a magic ring, single crochet, increases, decreases, double crochet, and sewing can practice individual parts first. The source ambiguities make it unsuitable to present as a fully tested, effortless first project.
Can I make only a rose shell without the other flowers?
Yes, as a layout adaptation. You can use a smaller selection of rolled roses and leaves, but arrange them on the finished dome before sewing. Changing the decoration does not require changing the shell’s stitch counts. Keep the large and small rose instructions distinct because their construction differs.
Is there a free PDF?
This page contains the written transcription and the original supplied image references. No separate verified designer PDF is provided here. Your browser’s Print command can save the article as a PDF, though the original image resolution and pattern ambiguities remain unchanged.
Why are there corrections beside some rounds?
A repeated stitch sequence has a definite input and output count. For example, six repeats of one single crochet and one decrease consume 18 stitches and produce 12. If a source prints a different total, both cannot be correct. This guide makes those conflicts visible and separates possible repairs from the original text.
Ready to make a turtle in bloom?
Save this crochet turtle with flowers on shell guide so your size choice, stitch tables, flower methods, and assembly photos stay together. Start with a small sample, keep your marker handy, and review the source notes before working the affected rounds. Then enjoy building a shell that looks like a miniature bouquet.
Pattern provenance: Written text is adapted from the user-supplied flower-turtle pattern pages. The designer’s name is not visible in these files, so no authorship is claimed. Images 2–13 are reproduced unchanged. Confirm permission to republish third-party pattern pages before posting them publicly. No test-crochet, finished-size verification, or guaranteed search ranking is claimed.
Crochet Turtle With Flowers on Shell: Quick Summary and Final Tips
A crochet turtle with flowers on shell is one of the sweetest floral amigurumi projects you can make. Whether you choose the small gray version or the large pink version, every crochet turtle with flowers on shell follows the same simple idea: a rounded shell, a soft cream head, four little legs, and a garden of roses and leaves on top. If you are still deciding whether to start, this summary of the crochet turtle with flowers on shell will help you plan.
Why make a crochet turtle with flowers on shell?
- A crochet turtle with flowers on shell makes a lovely handmade gift for birthdays, baby showers, and Mother’s Day.
- A crochet turtle with flowers on shell is a great way to practice increases, decreases, and flower stitches in one project.
- A crochet turtle with flowers on shell looks beautiful as shelf décor, nursery décor, or a spring table centerpiece.
- A crochet turtle with flowers on shell can be made in any color, so you can match it to your favorite yarn stash.
- A crochet turtle with flowers on shell sells well as a finished handmade item because the roses make each turtle unique.
Tips for a neater crochet turtle with flowers on shell
First, use a stitch marker and count every round, because a clean shell makes the whole crochet turtle with flowers on shell look more professional. Second, keep your tension tight so the stuffing does not show through. Third, make one practice rose before you decorate your crochet turtle with flowers on shell, so you know how many petals you like. Finally, arrange the roses and leaves on the shell with pins before sewing, because the placement can change the whole look of your crochet turtle with flowers on shell.
If you want a quicker project, make the small crochet turtle with flowers on shell first and save the large crochet turtle with flowers on shell for later. Many crocheters make both sizes so they can display the pair together, just like the finished turtles in the photo above.
Common questions about the crochet turtle with flowers on shell
How long does a crochet turtle with flowers on shell take? The time depends on your speed, yarn, and the number of flowers, but plan separate sessions for the shell, the legs, the head, and the decorations. A crochet turtle with flowers on shell is easiest when you finish each part before moving on.
Can I change the flowers on my crochet turtle with flowers on shell? Yes. You can swap colors, add beads, or use fewer roses. The shell of the crochet turtle with flowers on shell stays the same, so the decoration is the easiest place to make it your own.
Where should I place the flowers on a crochet turtle with flowers on shell? Start with the biggest rose in the center, then surround it with smaller flowers and finish with the green leaves. This layout keeps your crochet turtle with flowers on shell balanced and full.
Start Your Crochet Turtle With Flowers on Shell Today
Now you have everything you need to make your own crochet turtle with flowers on shell: the materials, the stitch tables, the flower instructions, and the assembly photos. Save this crochet turtle with flowers on shell pattern, share it with your crochet friends, and come back to it whenever you need a stitch count. Happy crocheting, and enjoy your beautiful crochet turtle with flowers on shell!


I hope it comes out. Beautiful