

Crochet Bag Pattern Free: Easy Ruffle Bucket Bag With Drawstring (Step-by-Step Guide)
Looking for a crochet bag pattern free that looks like it came from a boutique? You are in the right place. This crochet bag pattern free walks you through a sweet pink and mint ruffle bucket bag with a flat round base, sturdy single crochet sides, a pretty eyelet round, three-layer frills, a long strap and a cinch-up drawstring. Every round is written out below, so you can follow this crochet bag pattern free from the first chain to the final bow.
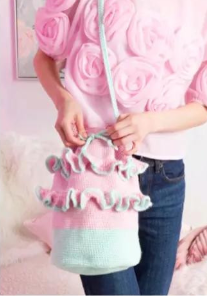
Crochet Bag Pattern Free: Quick Facts
| Project | Ruffle drawstring bucket bag (crochet tote-style shoulder bag) |
|---|---|
| Finished size | About 8½” [21.5 cm] diameter x 12″ [30.5 cm] tall, not including the frills and strap |
| Yarn | Caron Simply Soft: Contrast A Soft Green (9739), Contrast B Soft Pink (9719) |
| Hook | US G/6 (4 mm), or the size needed to match gauge |
| Gauge | 16 sc and 17 rows = 4″ [10 cm] |
| Stitches used | Chain, slip stitch, single crochet, half double crochet, double crochet |
| Cost | This crochet bag pattern free costs nothing, only yarn |
What is inside this crochet bag pattern free
- Why this crochet bag pattern free is worth your yarn
- Materials, gauge and size
- Abbreviations and pattern notes
- Step 1: Crochet the round base
- Step 2: Work the sides of the bag
- Step 3: Make the eyelet round
- Step 4: Crochet the frills
- Step 5: Crochet the strap
- Step 6: Drawstring and finishing
- Tips for a perfect crochet bag
- Crochet bag pattern free FAQ
Why This Crochet Bag Pattern Free Is Worth Your Yarn
A good crochet bag pattern free should be easy to read, use affordable yarn and give you something you will actually carry. This one does all three. The bag is worked in the round from the bottom up, so there is no seaming on the body. Single crochet makes a dense, firm fabric that holds its shape, which is exactly what a bucket bag needs. The ruffles add the “wow” factor without any complicated stitches.
If you have been searching for a crochet bag pattern free that is more exciting than a plain market bag, this ruffle bucket bag is a lovely next project. It makes a great handmade gift, a cute purse for a little one, or a statement piece for your own wardrobe. Crocheters on Pinterest, Ravelry and Etsy are always hunting for a crochet bag pattern free with clear instructions, and the written rounds and charts below give you both.
Materials, Gauge and Size for This Crochet Bag Pattern Free
Gather these supplies before you start the crochet bag pattern free. The original design uses Caron Simply Soft, a soft acrylic worsted weight yarn that comes in a huge range of colors, plus Susan Bates tools.
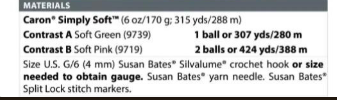
- Caron Simply Soft (6 oz/170 g; 315 yds/288 m)
- Contrast A: Soft Green (9739), 1 ball or 307 yds/280 m
- Contrast B: Soft Pink (9719), 2 balls or 424 yds/388 m
- Size U.S. G/6 (4 mm) Susan Bates Silvalume crochet hook, or size needed to obtain gauge
- Susan Bates yarn needle
- Susan Bates Split Lock stitch markers
Measurements: approx 8½” [21.5 cm] diameter x 12″ [30.5 cm] tall, excluding frills and strap.
Gauge: 16 sc and 17 rows = 4″ [10 cm]. Always crochet a gauge swatch before you begin any crochet bag pattern free. If your swatch is too big, go down a hook size. If it is too small, go up a hook size.
Abbreviations and Notes for the Crochet Bag Pattern Free
This crochet bag pattern free is written in US crochet terms. Here is the key to every abbreviation used in the pattern.
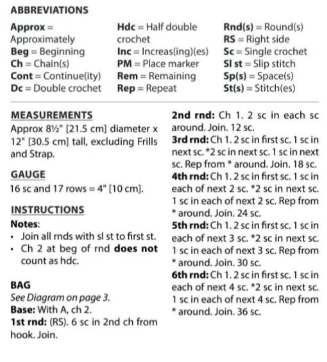
| Approx | Approximately |
|---|---|
| Beg | Beginning |
| Ch | Chain(s) |
| Cont | Continue(ity) |
| Dc | Double crochet |
| Hdc | Half double crochet |
| Inc | Increas(ing)(es) |
| PM | Place marker |
| Rem | Remaining |
| Rep | Repeat |
| Rnd(s) | Round(s) |
| RS | Right side |
| Sc | Single crochet |
| Sl st | Slip stitch |
| Sp(s) | Space(s) |
| St(s) | Stitch(es) |
Pattern notes for this crochet bag pattern free:
- Join all rnds with sl st to first st.
- Ch 2 at beg of rnd does not count as hdc.
Step 1: Crochet the Base of the Bag
Every crochet bag pattern free that starts with a flat circle needs even increases, so keep your stitch markers handy. With Contrast A (soft green), ch 2.
- 1st rnd (RS): 6 sc in 2nd ch from hook. Join.
- 2nd rnd: Ch 1. 2 sc in each sc around. Join. 12 sc.
- 3rd rnd: Ch 1. 2 sc in first sc. 1 sc in next sc. *2 sc in next sc. 1 sc in next sc. Rep from * around. Join. 18 sc.
- 4th rnd: Ch 1. 2 sc in first sc. 1 sc in each of next 2 sc. *2 sc in next sc. 1 sc in each of next 2 sc. Rep from * around. Join. 24 sc.
- 5th rnd: Ch 1. 2 sc in first sc. 1 sc in each of next 3 sc. *2 sc in next sc. 1 sc in each of next 3 sc. Rep from * around. Join. 30 sc.
- 6th rnd: Ch 1. 2 sc in first sc. 1 sc in each of next 4 sc. *2 sc in next sc. 1 sc in each of next 4 sc. Rep from * around. Join. 36 sc.
- 7th rnd: Ch 1. 2 sc in first sc. 1 sc in each of next 5 sc. *2 sc in next sc. 1 sc in each of next 5 sc. Rep from * around. Join. 42 sc.
- 8th rnd: Ch 1. 2 sc in first sc. 1 sc in each of next 6 sc. *2 sc in next sc. 1 sc in each of next 6 sc. Rep from * around. Join. 48 sc.
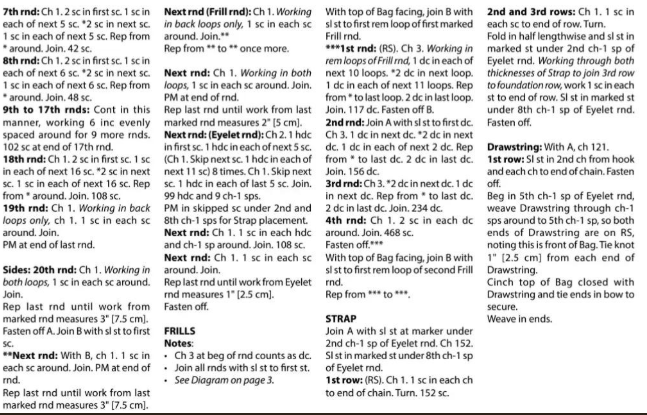
- 9th to 17th rnds: Cont in this manner, working 6 inc evenly spaced around for 9 more rnds. 102 sc at end of 17th rnd.
- 18th rnd: Ch 1. 2 sc in first sc. 1 sc in each of next 16 sc. *2 sc in next sc. 1 sc in each of next 16 sc. Rep from * around. Join. 108 sc.
- 19th rnd: Ch 1. Working in back loops only, 1 sc in each sc around. Join. PM at end of last rnd.
Your base is done. The back loop round creates the corner that turns the flat circle into the walls of the bag, which is the clever part of this crochet bag pattern free.
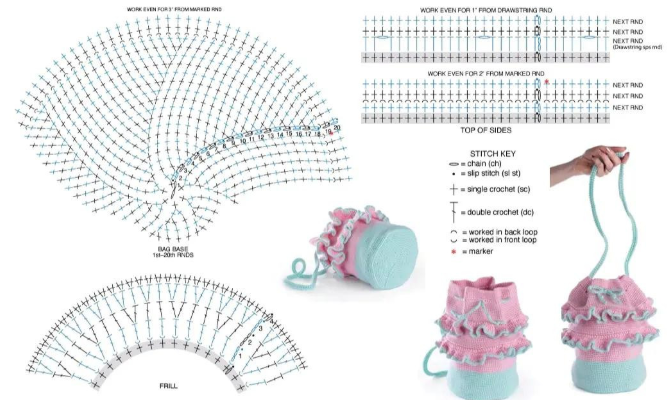
Crochet Bag Pattern Free Chart: Base, Frill and Stitch Key
Visual learners, this chart is for you. It shows the bag base (rounds 1 to 20), the frill, the side rounds and the stitch key. Keep it open next to the written crochet bag pattern free while you work.
Step 2: Work the Sides of the Bag
Now the crochet bag pattern free grows upward. These rounds are plain single crochet, so they go quickly.
- 20th rnd: Ch 1. Working in both loops, 1 sc in each sc around. Join.
- Rep last rnd until work from marked rnd measures 3″ [7.5 cm]. Fasten off A. Join B (soft pink) with sl st to first sc.
- **Next rnd: With B, ch 1. 1 sc in each sc around. Join. PM at end of rnd.
- Rep last rnd until work from last marked rnd measures 3″ [7.5 cm].
- Next rnd (Frill rnd): Ch 1. Working in back loops only, 1 sc in each sc around. Join.**
- Rep from ** to ** once more.
- Next rnd: Ch 1. Working in both loops, 1 sc in each sc around. Join. PM at end of rnd.
- Rep last rnd until work from last marked rnd measures 2″ [5 cm].
The two Frill rounds worked in back loops only leave a neat row of front loops on each ridge. You will crochet the ruffles into those loops later, so every crochet bag pattern free follower should mark them clearly.
Step 3: Make the Eyelet Round
The eyelet round makes the little holes where the drawstring threads through. It is the finishing detail that turns this crochet bag pattern free into a real drawstring bucket bag.
- Next rnd (Eyelet rnd): Ch 2. 1 hdc in first sc. 1 hdc in each of next 5 sc. (Ch 1. Skip next sc. 1 hdc in each of next 11 sc) 8 times. Ch 1. Skip next sc. 1 hdc in each of last 5 sc. Join. 99 hdc and 9 ch-1 sps.
- PM in skipped sc between 2nd and 8th ch-1 sps for Strap placement.
- Next rnd: Ch 1. 1 sc in each hdc and ch-1 sp around. Join. 108 sc.
- Next rnd: Ch 1. 1 sc in each sc around. Join.
- Rep last rnd until Eyelet rnd measures 1″ [2.5 cm]. Fasten off.
Step 4: Crochet the Frills
This is the part everyone loves in a ruffle crochet bag pattern free. Work two frills, one into each marked Frill round.
Frill notes:
- Ch 3 at beg of rnd counts as dc.
- Join all rnds with sl st to first st.
- See the diagram above.
First Frill
With top of Bag facing, join B with sl st to first rem loop of first marked Frill rnd.
- ***1st rnd (RS): Ch 3. Working in rem loops of Frill rnd, 1 dc in each of next 10 loops. *2 dc in next loop. 1 dc in each of next 11 loops. Rep from * to last loop. 2 dc in last loop. Join. 117 dc. Fasten off B.
- 2nd rnd: Join A with sl st to first dc. Ch 3. 1 dc in next dc. *2 dc in next dc. 1 dc in each of next 2 dc. Rep from * to last dc. 2 dc in last dc. Join. 156 dc.
- 3rd rnd: Ch 3. *2 dc in next dc. 1 dc in next dc. Rep from * to last dc. 2 dc in last dc. Join. 234 dc.
- 4th rnd: Ch 1. 2 sc in each dc around. Join. 468 sc. Fasten off.***
Second Frill
With top of Bag facing, join B with sl st to first rem loop of second Frill rnd. Rep from *** to ***.
Two layers of ruffles make this crochet bag pattern free stand out from every plain bucket bag pattern you have seen.
Step 5: Crochet the Strap
The strap is worked as a long chain and then folded and joined, so it ends up strong enough for everyday carrying.
- Join A with sl st at marker under 2nd ch-1 sp of Eyelet rnd. Ch 152. Sl st in marked st under 8th ch-1 sp of Eyelet rnd.
- 1st rnd (RS): Ch 1. 1 sc in each ch to end of chain. Turn. 152 sc.
- 2nd and 3rd rows: Ch 1. 1 sc in each sc to end of row. Turn.
- Fold in half lengthwise and sl st in marked st under 2nd ch-1 sp of Eyelet rnd. Working through both thicknesses of Strap to join 3rd row to foundation row, work 1 sc in each sc to end of row. Sl st in marked st under 8th ch-1 sp of Eyelet rnd. Fasten off.
Step 6: Drawstring and Finishing Touches
- Drawstring: With A, ch 121.
- 1st row: Sl st in 2nd ch from hook and each ch to end of chain. Fasten off.
- Beg in 5th ch-1 sp of Eyelet rnd, weave Drawstring through ch-1 sps around until both ends of Drawstring are on RS, noting this is the front of Bag. Tie knot 1″ [2.5 cm] from each end of Drawstring.
- Cinch top of Bag closed with Drawstring and tie ends in bow to secure.
- Weave in ends.
That is the whole crochet bag pattern free. Hold up your finished bag and admire those ruffles!
Tips for a Perfect Crochet Bag (Beginner Friendly)
- Check your gauge. A tight gauge makes a sturdy bag, so swatch first for any crochet bag pattern free.
- Use stitch markers. Mark the first stitch of every round. Susan Bates Split Lock markers are ideal for this crochet bag pattern free.
- Count your increases. Check the stitch count at the end of each base round so the circle stays flat.
- Keep the base flat. If it starts to cup, you have too few increases. If it ruffles, you have too many.
- Choose yarn with care. Soft acrylic worsted yarn gives lovely drape in the frills. For a firmer everyday bag, try a cotton yarn and match the gauge.
- Weave in ends as you go. It saves time at the end of the crochet bag pattern free.
Color Ideas for Your Crochet Bag Pattern Free
Pink and mint is the classic look, but this crochet bag pattern free works in any color pair. Try lavender with cream for a spring bag, red and white for a festive version, or navy and yellow for a bold look. Use one color for the base and strap, and another for the body and frills, just like the original.
Crochet Bag Pattern Free: Frequently Asked Questions
What is the best crochet stitch for making a bag?
Single crochet is the best crochet stitch for making a bag because it creates a dense, firm fabric with small gaps. That is why this crochet bag pattern free uses single crochet for the base and sides. Half double crochet and double crochet work well for decorative areas like the eyelet round and frills.
Is there a free pattern for an easy crochet bag?
Yes. This crochet bag pattern free is a complete, written, step-by-step pattern with charts and a materials list. It uses only basic stitches, so a confident beginner can follow this crochet bag pattern free from start to finish.
How do I crochet a tote bag?
To crochet a tote bag, start with a flat base, work the sides upward in single crochet, then add a strap or handles. This crochet bag pattern free follows the same method for a bucket bag, and you can adapt it into a tote by working the base as an oval instead of a circle.
How do I make a crochet bag step by step for beginners?
Follow these steps: 1) make the round base, 2) crochet the sides, 3) add an eyelet round, 4) crochet the frills, 5) make the strap, 6) add the drawstring. Each step is written out in this crochet bag pattern free.
What yarn should I use for a crochet bag pattern free?
The original uses Caron Simply Soft in Soft Green (9739) and Soft Pink (9719). Any worsted weight yarn that matches the gauge of 16 sc and 17 rows = 4″ [10 cm] will work for this crochet bag pattern free.
How big is the finished bag?
About 8½” [21.5 cm] in diameter and 12″ [30.5 cm] tall, not counting the frills and strap.
Loved this crochet bag pattern free?
Save it to Pinterest, share it with a crochet friend and browse more free crochet patterns on our blog. Tell us in the comments which colors you chose!
Pattern credit: this ruffle bucket bag design uses Caron Simply Soft yarn and Susan Bates tools (Yarnspirations). Find the original on Yarnspirations and explore more on Ravelry.


