

HALLOWEEN CROCHET · PHOTO TUTORIAL · US CROCHET TERMS
Crochet Pumpkin Free Pattern: A Spooky Little Cutie
A crooked green stem. Two wonderfully mismatched eyes. One cheeky little tooth. This crochet pumpkin free pattern turns a simple ribbed rectangle into the kind of Halloween decoration that makes you smile before you even pick it up.Quick answer
This crochet pumpkin free pattern uses a half double crochet rectangle worked in back loops, then seamed, stuffed and shaped into six pumpkin segments. A tapered single crochet stem and an embroidered face finish the decoration. The supplied design specifies a 2 mm hook and a 12 × 30 cm body panel.
Pattern and original photographs: softtouch_amigurumi. This article presents the supplied instructions with permission confirmed by the publisher. The original source identifies the design as paid and reserves redistribution rights; this permission does not grant readers further redistribution rights.
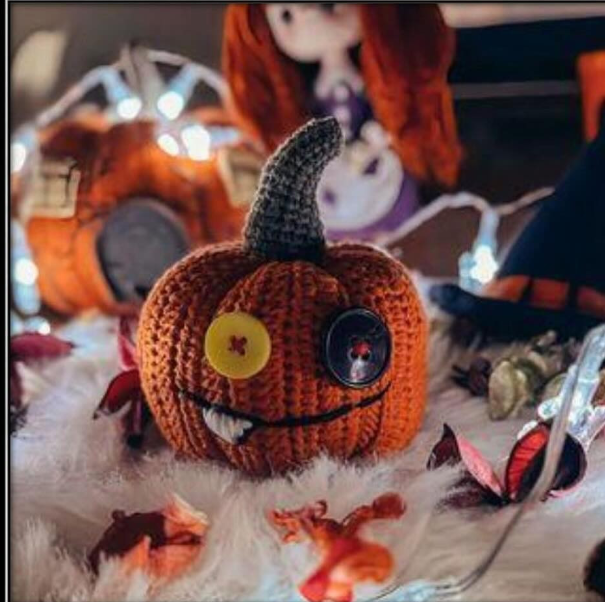
If you have been searching for a crochet pumpkin free pattern with more personality than a plain stuffed pumpkin, this photo-led project gives you both the rounded autumn shape and a playful jack-o’-lantern face. The body starts flat, so you can measure your progress before any stuffing or shaping happens.Jump straight to your next step
- Yarn, hook and materials
- Stitches and abbreviations
- Written pumpkin pattern
- Stem rounds and stitch counts
- Button eyes and embroidered smile
- Troubleshooting
- Frequently asked questions
What will you make with this crochet pumpkin free pattern?
You will make an orange ribbed crochet pumpkin with six sculpted segments, a khaki green stem, two different button eyes and a stitched smile with a white tooth. It is a decorative amigurumi-style project that combines flat crochet, working in rounds, seaming and yarn sculpting.
The crochet pumpkin free pattern is best approached as a confident-beginner project: the stitches are basic, but finishing requires a little care. You should be comfortable with half double crochet, single crochet, decreases and threading a yarn needle. The photos show each main construction stage.
| Terminology | US crochet terms |
|---|---|
| Body construction | Flat rectangle in half double crochet, back loop only |
| Panel measurement | 12 cm × 30 cm before assembly |
| Stem construction | 18 rounds with single crochet and decreases |
| Finished size and gauge | Not specified in the supplied pages |
| Best use | Autumn display or Halloween shelf decoration |
Use the panel measurements as your practical checkpoint. Finished height and width depend on your tension, stuffing and sculpting; the source does not give a finished-size guarantee.
What yarn and supplies do you need?
The supplied crochet pumpkin free pattern uses orange YarnArt Jeans for the body and khaki green Alize Cotton Gold for the stem. The amounts below reproduce the source’s quantities rather than a newly tested yardage estimate.
- Body yarn: YarnArt Jeans, orange colour 85 — 2 skeins.
- Stem yarn: Alize Cotton Gold, khaki green colour 270 — approximately one-third of a skein.
- Crochet hook: 2 mm.
- Eyes: one 23 mm button and one 17 mm button.
- Stuffing: fiberfill or another suitable stuffing material.
- Tools: stitch marker, measuring tape, sewing or yarn needle, and scissors.
- Stem support: wire 1.3–1.5 mm in diameter, as specified in the source.
- Face details: dark thread for the mouth, thin white thread for the tooth, and red thread for sewing on the eyes.
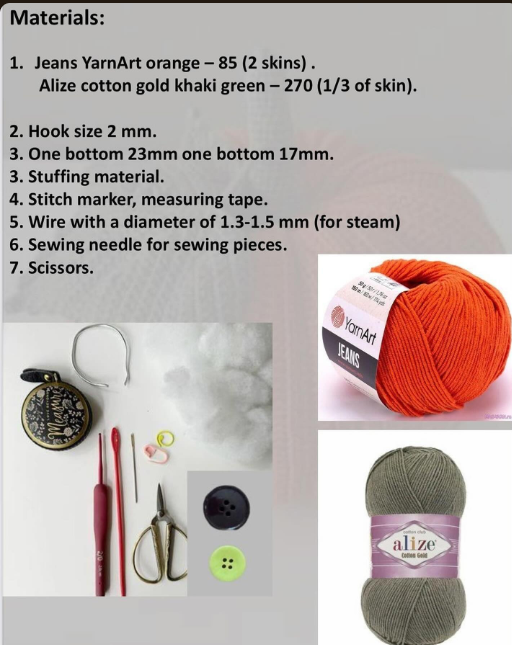
For this crochet pumpkin free pattern, choose fabric density over a very loose finish. If fiberfill shows through your stitches, check your tension and hook choice before assembling the whole pumpkin. Substituting yarn can change the dimensions and the amount you need.
Decoration note: buttons and an internal wire make this version unsuitable as a baby or toddler toy. For a soft alternative, embroider the eyes and omit the wire; the stem will have a different shape and less support.
Which crochet abbreviations does the pattern use?
Read this crochet pumpkin free pattern using US stitch names. In particular, US half double crochet is UK half treble crochet, and US single crochet is UK double crochet. The Craft Yarn Council abbreviation guide provides the standard terms and US/UK equivalents.CHChain. SL STSlip stitch. The source image says “sleep stitch”; this is a wording error. SCSingle crochet. T-CHTurning chain. INCIncrease. DECDecrease. In the stem, work a single crochet decrease over two stitches. HDCHalf double crochet. BLOBack loop only: insert the hook under the back loop of the stitch. (number)Total stitches at the end of a row or round. (instructions) × NRepeat the instructions in brackets N times.
The abbreviation photo also includes the designer’s original rights notice. Keep that credit with the supplied pattern materials. For help reading repeats and distinguishing rows from rounds, consult the Craft Yarn Council guide to reading a crochet pattern.
Crochet pumpkin free pattern: the written body instructions
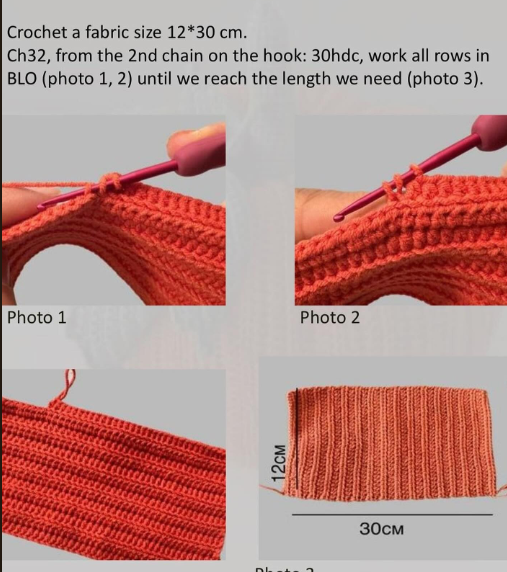
The body of this crochet pumpkin free pattern is a ribbed rectangle measuring approximately 12 × 30 cm. The 12 cm direction becomes the pumpkin’s top-to-bottom direction before gathering; the 30 cm direction wraps around the body.
Step 1: Crochet the ribbed rectangle
Source instruction, transcribed: “Crochet a fabric size 12*30 cm. Ch32, from the 2nd chain on the hook: 30hdc, work all rows in BLO (photo 1, 2) until we reach the length we need (photo 3).”Stitch-count clarification
There is a mismatch in the source: a chain of 32 worked from the second chain leaves 31 available chains, while the stated row count is 30 HDC. An editorial interpretation is to chain 32 and begin in the third chain to make 30 HDC, with the two skipped chains not counted as a stitch. This interpretation is not a designer-confirmed correction or a physically tested amendment.
For the remaining rows, turn and work HDC in the back loop of each stitch, keeping 30 working stitches if you follow that interpretation. The source does not specify the turning-chain length. A suggested working method is CH 2, turn, and do not count the turning chain as a stitch; confirm the edges stay even.
Continue until the panel is approximately 30 cm long. Check the other dimension against the 12 cm target. The crochet pumpkin free pattern gives a measurement rather than a fixed number of rows, so measure the fabric flat without stretching it.
Step 2: Join the rectangle and gather one opening
Bring the two short edges together to form a tube and connect the edges with slip stitches. Leave a long yarn tail for needle sculpting. Gather one open edge with a needle: pass the yarn through the edge loops, pull gently, then pass around the opening again until the hole closes.
The supplied assembly page places gathering and joining instructions together; the sequence above is an editorial arrangement of those same actions. Avoid pulling the gathering yarn so hard that it snaps. The crochet pumpkin free pattern needs a secure gathered end before you add stuffing.
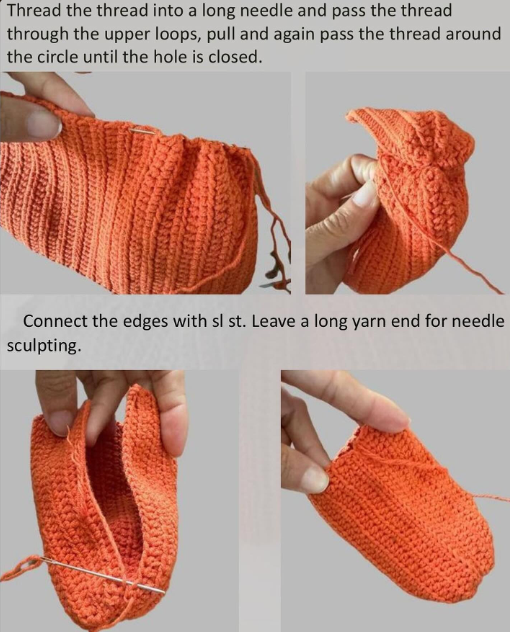
Step 3: Stuff and close the pumpkin
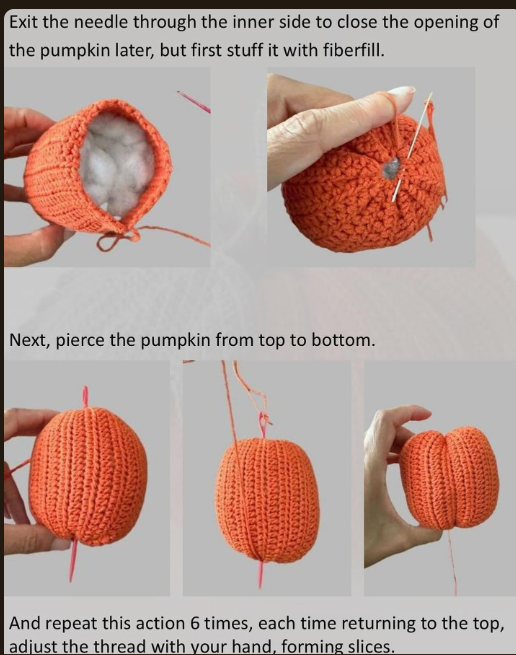
Bring the needle through the inside so the remaining opening can be closed later. First, stuff the pumpkin with fiberfill. Add stuffing in small portions and spread it into the sides rather than leaving a single dense lump in the middle.
Gather and close the remaining opening. For this crochet pumpkin free pattern, aim for a body that feels full but can still be compressed when you sculpt the segments. Excessively firm stuffing makes the shaping step harder.
Step 4: Sculpt six pumpkin segments
Pierce the pumpkin from top to bottom with the needle. Repeat the sculpting action six times, returning to the top each time. Position the yarn around the outside to define the segments and adjust the tension by hand to form the pumpkin slices.
Space the sculpting lines around the body and tighten them gradually. The crochet pumpkin free pattern uses this combination of back-loop ribbing and yarn sculpting to create its rounded pumpkin shape. Secure the yarn once the segments look balanced.
How do you crochet the curved green stem?
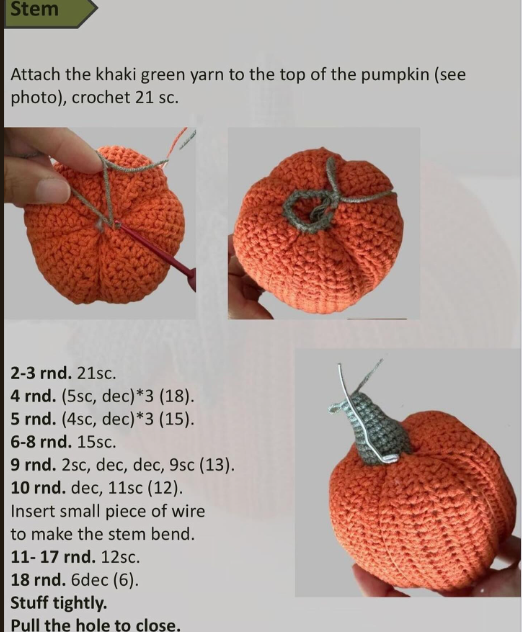
The stem in this crochet pumpkin free pattern begins with 21 single crochet stitches attached directly to the top of the pumpkin. It narrows through decreases, continues as a 12-stitch tube, then closes with a final decrease round.
Attach the khaki green yarn to the top of the pumpkin as shown in the photograph. Crochet 21 SC around the attachment area. The source does not specify exact placement points or whether rounds are joined; use a stitch marker to track the start of each round and follow the pictured placement.
| Round | Instructions | Stitches |
|---|---|---|
| 1 | Attach green yarn; crochet 21 SC at the top of the pumpkin. | 21 |
| 2–3 | SC in each stitch around. | 21 each round |
| 4 | (5 SC, DEC) × 3. | 18 |
| 5 | (4 SC, DEC) × 3. | 15 |
| 6–8 | SC in each stitch around. | 15 each round |
| 9 | 2 SC, DEC, DEC, 9 SC. | 13 |
| 10 | DEC, 11 SC. | 12 |
| 11–17 | SC in each stitch around. | 12 each round |
| 18 | DEC × 6. | 6 |
Source finishing instructions: after round 10, insert a small piece of wire to make the stem bend. Continue rounds 11–17, complete round 18, stuff tightly, and pull the hole closed.
When working this crochet pumpkin free pattern, handle the stem wire carefully and keep its ends fully enclosed. Do not allow a sharp end to press against the crochet fabric. Omitting the wire is an option for a softer decorative stem, but it will not hold the same curve.
How do you add the button eyes and cheeky smile?
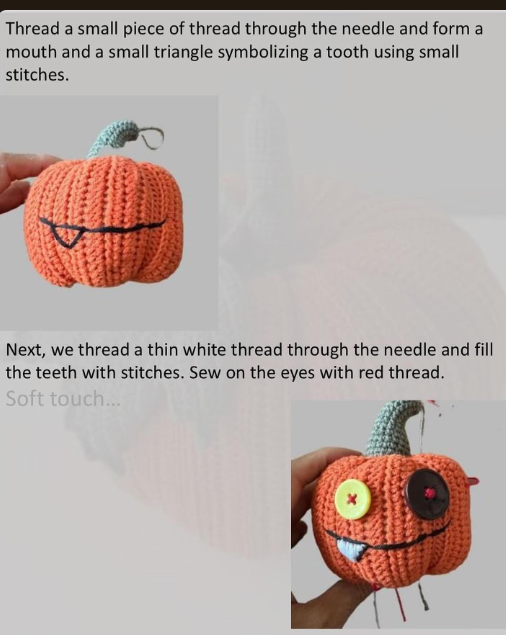
The face gives this crochet pumpkin free pattern its Halloween character. Use small stitches to create a curved mouth and a small triangular tooth outline. Then fill the tooth with thin white thread and sew on the button eyes using red thread.
- Thread the needle with a small length of dark thread.
- Embroider a gently curved mouth across the front of the pumpkin.
- Use small stitches to outline a small triangle representing a tooth.
- Switch to thin white thread and fill the triangle with stitches.
- Sew on one 23 mm button and one 17 mm button with red thread.
- Secure the threads and hide the ends inside the body.
Before committing to the eye positions, hold the buttons against the pumpkin and check the expression. The crochet pumpkin free pattern looks particularly playful with one larger dark button and one smaller yellow-green button, as shown in the finished photograph.
Why is your crochet pumpkin not taking shape?
Most finishing problems in this crochet pumpkin free pattern come from uneven stitch counts, an incorrectly sized rectangle, or stuffing that is too firm to sculpt. Check these details before undoing the whole project.
- Your panel widens or narrows: count the HDC stitches at the end of every row and check that you are not accidentally treating the turning chain as an extra stitch.
- The ridges are faint: confirm that subsequent rows are worked in back loops only.
- Stuffing shows through: check fabric density and reduce overly stretched stuffing pressure.
- The pumpkin looks like a ball: define six sculpting lines and tighten gradually, keeping the tension balanced.
- A gathered opening stays loose: pass the yarn around the edge again before securing it.
- The stem count is wrong: a DEC consumes two stitches and produces one. Round 9 consumes 15 stitches and finishes with 13; round 10 consumes 13 and finishes with 12.
If your version of the crochet pumpkin free pattern looks taller or wider than the photo, compare the original panel dimensions first. Changing yarn, hook, tension or stuffing can all change the finished proportions. No finished-project gauge or physical test result is supplied here.
How can you style your finished Halloween pumpkin?
Display the finished pumpkin on an autumn shelf, beside a basket of yarn, or as part of a Halloween table arrangement. The warm orange body and green stem already carry the seasonal colour palette, so a simple background lets the handmade stitches stand out.
Make the crochet pumpkin free pattern your own with different eye colours, a wider grin or a plain face-free finish. These are styling choices rather than additional instructions from the designer. For a soft-face version, embroider the eyes instead of attaching buttons.
Keep the decoration away from candles and other heat sources. Choose battery-powered lights if you want the cosy illuminated look of the reference photograph.
Frequently asked questions
What is the best free crochet pumpkin pattern?
The best choice depends on your skills and the finish you want. This crochet pumpkin free pattern suits makers who want a ribbed body, a shaped green stem and a button-face Halloween decoration. A plain rectangle-based pumpkin without the face or wire is a simpler starting point.
How do you crochet a pumpkin for beginners step by step?
Crochet a back-loop ribbed rectangle, join it into a tube, gather one end, add stuffing, close the other end and sculpt the segments. Finish with the stem and facial details. In this design, the body panel is 12 × 30 cm; review the documented starting-chain discrepancy before beginning.
What are some free patterns for making pumpkins?
Common approaches include ribbed rectangles gathered into pumpkins, seamless pumpkins worked in rounds, and miniature pumpkins for garlands. This crochet pumpkin free pattern uses the rectangle method, with a separate stem worked directly onto the top.
How do you make a pumpkin easy?
Use the rectangle method and keep the finish simple. Work the ribbed panel, seam it, stuff it and add sculpting yarn. Leaving off the embroidered face and wire-supported stem reduces the finishing work, although the result will differ from the photographed design.
Can I use a different yarn or crochet hook?
Yes, but substitutions change the fabric and finished size. For this crochet pumpkin free pattern, keep the body panel close to the stated dimensions and use stitches dense enough to contain the filling. The specified hook is 2 mm; alternative yarn amounts are not tested.
Is this pumpkin safe as a toy for small children?
The photographed version is intended here as a decoration. It includes sewn buttons and an internal stem wire. Removing those parts does not automatically certify the finished item as a child-safe toy.
Do I need a magic ring for the pumpkin body?
No. This crochet pumpkin free pattern starts with a foundation chain and a flat HDC panel. The stem is attached directly to the completed pumpkin rather than beginning with a separate magic ring.
Ready to make your spooky little pumpkin?
Gather your orange yarn, check the written stitch counts and start with the ribbed rectangle. Follow the photos through seaming, stuffing, sculpting and the face. Save this crochet pumpkin free pattern for your next autumn crafting session, then make the smile your own.
Designer and original image credit: softtouch_amigurumi. Text transcribed and clarified from the supplied pattern pages. Editorial suggestions are labelled; this version has not been physically crochet-tested.


