

Crochet Halloween Patterns Free: The Hello Pumpkitten Amigurumi Guide
Free Amigurumi Tutorial · US Terms
Crochet Halloween Patterns Free: The Complete “Hello Pumpkitten” Guide
A full, free, beginner-tested crochet Halloween pattern round by round, photo by photo plus the answers to every question crocheters actually type into Google before they pick up a hook.
⏱ ~5–7 hours for a beginner🧶 Worsted weight (4)🪝 3.0–3.5mm hook📏 Finished size: ~5 in / 13 cm tall
FC
Written & tested by a crochet designer with 20+ years at the hook.
Every round below was stitched, ripped back, and re-stitched before it went into this post, so when I say “this is the best free crochet pattern for a Halloween pumpkin cat,” I mean I’ve actually made the thing three times to be sure the stitch counts hold up.
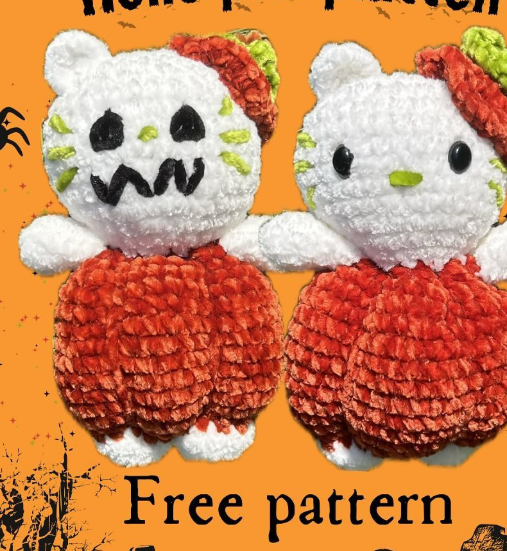
Let’s be honest: the internet is completely flooded with crochet halloween patterns free to download, and about half of them are missing a stitch count, a step, or an entire round. I know because I’ve spent two decades untangling other designers’ typos for my own students. So this post is my answer to that mess a single, complete crochet halloween patterns free tutorial for an amigurumi I’m calling the Hello Pumpkitten: a round-eared kitty tucked into a crocheted pumpkin body, with a little pumpkin-stem hat and a bow to finish her off. You can make her sweet and smiling, or give her a stitched skeleton face for a spookier vibe both versions are in here.
What’s in this crochet Halloween patterns free guide
- Why this is one of the best free crochet Halloween patterns
- Where to find free crochet patterns (reader FAQ)
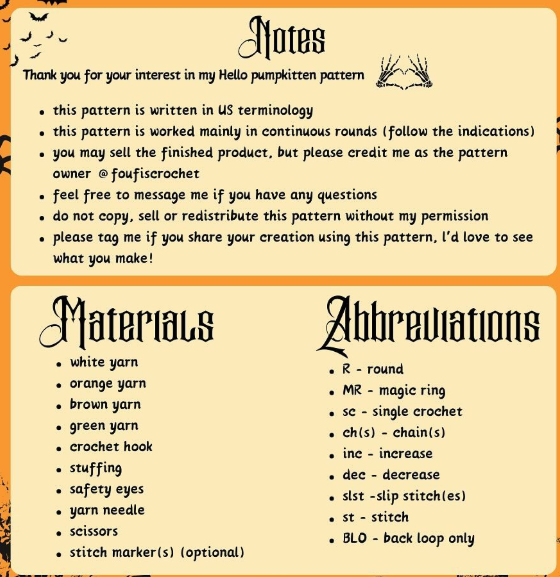
- Materials list (exact amounts)
- Tools you’ll need
- Abbreviations chart
- Designer’s notes & terms of use
- Step 1: Arms
- Step 2: Ear
- Step 3: Legs
- Step 4: Body (pumpkin base)
- Step 5: Head
- Pumpkin hat & bow
- Assembly & pumpkin-shaping details
- Facial details & finishing
- Stuffing & finishing techniques
- Troubleshooting section
- Yarn color swap notes / variations
- Common mistakes and how to fix them
- Care instructions
- More reader FAQ: trends, selling & profit
- Final thoughts
Why this is one of the best free crochet Halloween patterns you’ll stitch this year
I get asked constantly what the best site for free crochet patterns is, and honestly, the answer isn’t a single site it’s learning to spot a pattern that’s actually complete. A good free crochet Halloween pattern gives you a full materials list with real amounts, an abbreviations key, stitch counts you can check yourself round by round, and clear photos at every tricky step (like attaching an ear mid-round, which trips up even confident beginners). That’s the bar I held this Hello Pumpkitten pattern to, and it’s the bar you should hold every “free crochet pattern” download to before you commit an evening to it.
What makes this particular design such a strong choice among crochet halloween patterns free options is that it’s genuinely two patterns in one: stitch the face as a cute smiling kitty, or embroider a skeleton face for something spookier both instructions are included below in the finishing section. It’s a small, fast amigurumi (a beginner can realistically finish her in one weekend), which makes it one of the best free crochet patterns for Halloween if you want a finished decoration without a multi-week commitment.
Where to find free crochet patterns (and other questions I get asked constantly)
Where can I find all free crochet patterns to download?
Ravelry, designer blogs (like the one behind this pumpkitten pattern), and Pinterest boards curated around specific themes are your three best sources. The trick with any site claiming “free crochet patterns” is checking that the pattern includes a full abbreviations chart and stitch counts — if it doesn’t, expect to get stuck by round four. Where is the best place to buy crochet patterns, if I want to go beyond free ones?
Ravelry’s marketplace and Etsy are the two most reliable places to buy tested, well-photographed crochet patterns directly from independent designers, and buying directly supports the designer far more than free downloads shared secondhand. What are some of the best free crochet patterns for a beginner?
Amigurumi with simple shaping — spheres, ovals, and small limbs worked in continuous rounds — are the best entry point. This Hello Pumpkitten pattern is a great example: every piece is built from basic single crochet, increases, and decreases, with no complex stitches at all. What’s the best free crochet app?
Ravelry’s app remains the most complete free tool for organizing patterns, tracking your project progress, and searching by yarn weight or hook size. Is Ravelry free to use?
Yes — creating a Ravelry account and browsing or storing patterns is free; you only pay if you choose to purchase a designer’s premium pattern through the platform. What is the best free crochet pattern maker app?
For charting your own amigurumi rounds and stitch counts (exactly like the ones below), simple spreadsheet templates or dedicated crochet chart apps work well — the important thing, whichever tool you use, is that it forces you to track your stitch count after every single round the way I’ve done throughout this post.
Materials list — exact amounts
Here is everything you need to stitch this crochet Halloween pattern from start to finish. Amounts below are estimated generously for one finished Hello Pumpkitten (about 5 inches / 13 cm tall) — always keep a little extra yarn on hand.
| Material | Amount | Used for |
|---|---|---|
| White worsted weight (4) yarn | ≈ 35–40 grams | Arms, ear, legs, head |
| Orange worsted weight (4) yarn | ≈ 30–35 grams | Pumpkin body, pumpkin hat (R5–R8) |
| Brown worsted weight (4) yarn | ≈ 5 grams | Pumpkin hat base/stem (R1–R4) |
| Green worsted weight (4) yarn | ≈ 4–5 grams | Bow, whisker embroidery |
| Black embroidery thread or yarn scrap | Small amount (under 1 gram) | Eyes & mouth embroidery (scary version) |
| Polyester fiberfill stuffing | ≈ 15–20 grams | Stuffing arms (optional), legs, body, head |
| Safety eyes | 1 pair, 6mm recommended | Cute kitty face (optional if doing scary version) |
Tools you’ll need
🪝 3.0–3.5mm crochet hook✂️ Scissors🪡 Yarn/tapestry needle📍 Stitch marker(s) — optional but recommended👁 Safety eye installer or pliers (optional)
A stitch marker isn’t strictly required since this pattern works in continuous rounds, but I strongly recommend using one anyway — it’s the single easiest way to avoid losing track of where round 1 started, especially once you’re 20+ rounds into the body.
Abbreviations chart
| Abbreviation | Meaning |
|---|---|
| R | Round |
| MR | Magic ring |
| sc | Single crochet |
| ch(s) | Chain(s) |
| inc | Increase |
| dec | Decrease |
| slst | Slip stitch(es) |
| st | Stitch |
| BLO | Back loop only |
Designer’s notes (please read before you start):
- This pattern is written in US terminology.
- It’s worked mainly in continuous rounds — follow the indications rather than joining each round.
- You may sell the finished product, but please credit the pattern owner, @foufiscrochet.
- Feel free to message the designer if you have questions.
- Do not copy, sell, or redistribute the written pattern itself without permission.
- Tag the designer if you share your finished piece — she loves seeing what you make with it.
Step 1: Arms
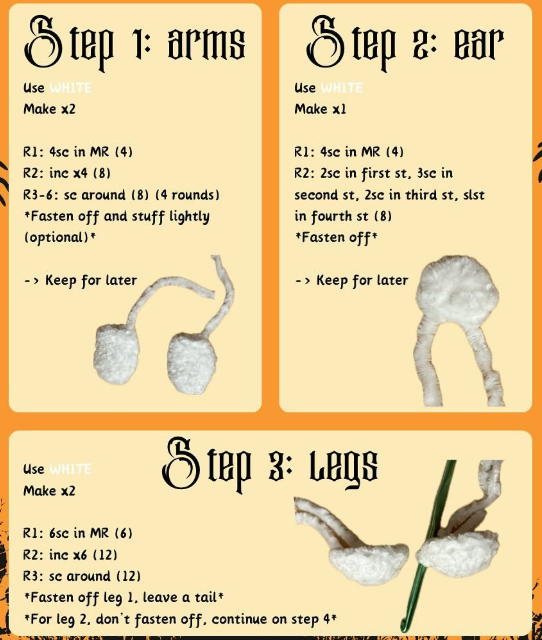
Use WHITE. Make x2.
R14 sts
4 sc in MR (4)
R28 sts
inc x4 (8)
R3–R68 sts
sc around (8) — 4 rounds total
Fasten off and stuff lightly (optional). Set both arms aside — you’ll attach them to the body in Step 4.
Step 2: Ear
Use WHITE. Make x1.
R14 sts
4 sc in MR (4)
R28 sts
2 sc in first st, 3 sc in second st, 2 sc in third st, slst in fourth st (8)
Fasten off. Set the ear aside — it gets sewn into the head during Step 5.
Step 3: Legs
Use WHITE. Make x2.
R16 sts
6 sc in MR (6)
R212 sts
inc x6 (12)
R312 sts
sc around (12)
Fasten off leg 1, leaving a tail — you’ll use this tail later to sew the gap between the legs closed. For leg 2, don’t fasten off; continue directly into Step 4 on this second leg.
Keep the tail from leg 1 handy and don’t trim it yet — the pattern reuses it in Step 4 to close the gap between the legs neatly.
Step 4: Body (pumpkin base)
Change to ORANGE.
R424 sts
Place your hook in leg 1 and sc around leg 1, join back to leg 2 and sc around. Your two legs should now be joined together (24). Make sure the tail of leg 1 is pointing outward.
R530 sts
(3sc, inc) x6 (30)
R636 sts
(4sc, inc) x6 (36)
R7–R1436 sts
sc around (36) — 8 rounds total
Use the tail from leg 1 to sew closed the gap between the legs. Start stuffing the body now, and keep adding stuffing as you go through the rest of this section.
R1530 sts
(4sc, dec) x6 (30)
R1624 sts
(3sc, dec) x6 (24)
R17 — attach both arms this round12 sts
dec x3, dec x2 through both sides of the arm and the body, dec x4, dec x2 through both sides of the arm and the body, dec (12)
Continue stuffing. Don’t fasten off — continue directly into Step 5, the head.
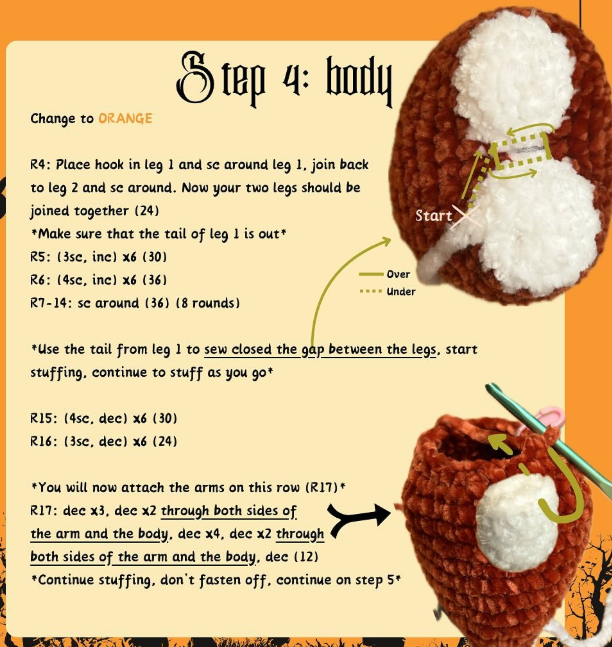
Round 17 is the trickiest round in the whole pattern — you’re decreasing and stitching through the arm at the same time, twice. Go slowly, and check the accompanying photo above so you can see exactly where the hook goes through both layers.
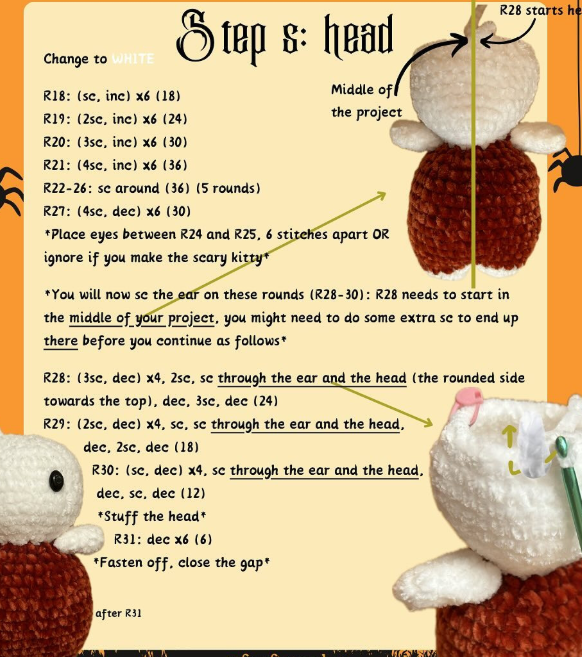
Step 5: Head
Change to WHITE.
R1818 sts
(sc, inc) x6 (18)
R1924 sts
(2sc, inc) x6 (24)
R2030 sts
(3sc, inc) x6 (30)
R2136 sts
(4sc, inc) x6 (36)
R22–R2636 sts
sc around (36) — 5 rounds total. Place the safety eyes between R24 and R25, six stitches apart, if you’re making the cute kitty version. Skip this if you’re stitching the scary kitty instead.
R2730 sts
(4sc, dec) x6 (30)
Now you’ll attach the ear across three special rounds (R28–R30). Round 28 needs to start in the middle of your project — you may need to work a few extra sc stitches first to get your hook positioned there before continuing.
R2824 sts
(3sc, dec) x4, 2sc, sc through the ear and the head (the rounded side of the ear facing the top), dec, 3sc, dec (24)
R2918 sts
(2sc, dec) x4, sc, sc through the ear and the head, dec, 2sc, dec (18)
R3012 sts
(sc, dec) x4, sc through the ear and the head, dec, sc, dec (12)
Stuff the head fully at this point.
R316 sts
dec x6 (6)
Fasten off and close the gap.
Pumpkin hat & bow
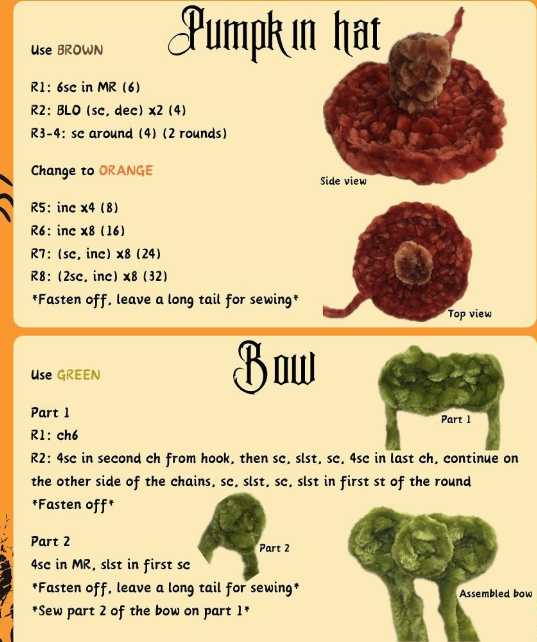
Pumpkin hat
Use BROWN.
R16 sts
6 sc in MR (6)
R24 sts
BLO (sc, dec) x2 (4)
R3–R44 sts
sc around (4) — 2 rounds
Change to ORANGE.
R58 sts
inc x4 (8)
R616 sts
inc x8 (16)
R724 sts
(sc, inc) x8 (24)
R832 sts
(2sc, inc) x8 (32)
Fasten off, leaving a long tail for sewing.
Bow
Use GREEN.
Part 1:
R1
ch6
R2
4sc in second ch from hook, then sc, slst, sc, 4sc in last ch, continue on the other side of the chains, sc, slst, sc, slst in first st of the round
Fasten off.
Part 2:
4sc in MR, slst in first sc
Fasten off, leaving a long tail for sewing. Sew Part 2 onto the center of Part 1 to form the finished bow shape.
Assembly & pumpkin-shaping details
This is the step that turns a plain orange ball into an actual pumpkin, and it’s worth doing carefully — it’s the difference between a Halloween decoration and just an orange amigurumi.
Attaching the hat
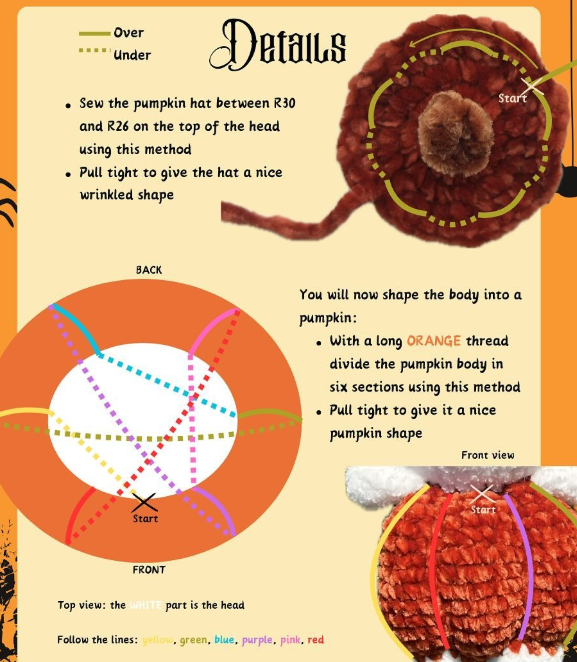
Sew the pumpkin hat onto the top of the head, positioned between R26 and R30, using the over/under weaving method shown in the diagram below. Pull the sewing thread tight as you go to give the hat a nice wrinkled, natural texture.
Shaping the pumpkin body
With a long strand of orange thread, divide the pumpkin body into six even sections using the over/under method illustrated below. Pull each line tight to create the pumpkin’s signature ridged shape. Follow the color-coded lines exactly as shown: yellow, green, blue, purple, pink, and red — each line runs from the top of the body, over the white head/neck join, down to the front and back, cinching the round body into six lobes.
Facial details & finishing
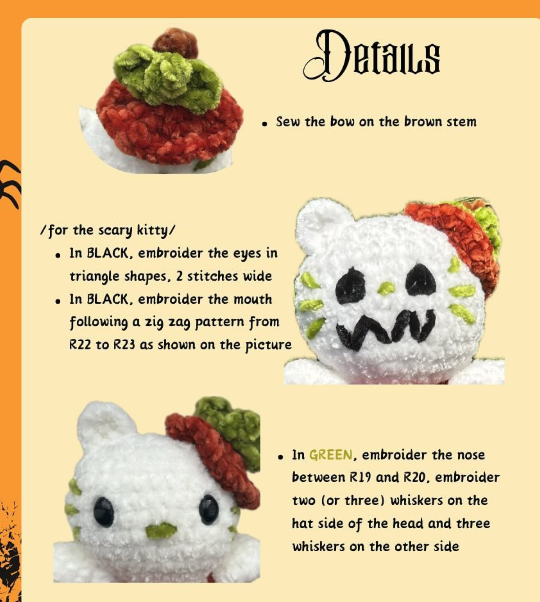
Sew the bow onto the brown stem of the pumpkin hat once the hat itself is secured to the head.
For the scary kitty version
- In BLACK, embroider the eyes as small triangle shapes, two stitches wide each.
- In BLACK, embroider the mouth in a zig-zag pattern running from R22 to R23, as shown in the photo.
For both versions
- In GREEN, embroider the nose between R19 and R20.
- Embroider two or three whiskers on the hat side of the head, and three whiskers on the opposite side.
Stuffing & finishing techniques
Amigurumi lives or dies by its stuffing, so here’s how I approach it after 20+ years of making pieces exactly this size:
- Stuff in small pinches, not one big handful. Feeding in small bits of fiberfill and pushing them into corners with a chopstick or the blunt end of a pen keeps the surface smooth instead of lumpy.
- Stuff as you close, not just at the end. This pattern tells you exactly when to start stuffing (Step 4, body) and when to finish (Step 5, before R31) — don’t wait until the piece is fully closed to add filling, or you won’t be able to reach the bottom.
- Firm but not tight. The pumpkin body should feel like a ripe tomato: solid enough to hold its shape, soft enough that the six-section shaping thread can still cinch it without the stitches straining.
- Weave in every tail through the stuffing, not just across the surface, so ends stay invisible and don’t slip loose over time.
Troubleshooting section
My stitch count is off after an increase or decrease round what happened?
Count your stitches at the end of every single round, not every few rounds this pattern gives you the expected count after each one specifically so you catch a mistake immediately rather than three rounds later, when it’s much harder to trace back. My pumpkin body doesn’t look ridged/pumpkin-shaped after shaping.
Pull the shaping thread tighter. It should visibly indent the orange fabric if the six lines look loose or flat, redo them with more tension, working one line at a time and knotting off before moving to the next. The ear looks lopsided or floppy on the head.
This usually means R28 wasn’t started in the true middle of the project as instructed. Unpick back to R27, re-count to the middle stitch, and restart R28 from there it’s worth the ten minutes it takes to redo. My arms won’t sit flush against the body after Round 17.
Make sure you’re genuinely crocheting through both layers the arm’s open stitches and the body’s stitches together not just tacking the arm on afterward with a needle. Working it as a true decrease-through-both-layers, as written, is what keeps the arm from wobbling loose. My finished piece looks too small or too large.
Check your gauge against a worsted weight (4) yarn and a 3.0–3.5mm hook. A larger hook or bulkier yarn will scale the whole Hello Pumpkitten up proportionally which is a perfectly valid variation if you want a bigger Halloween decoration.
Yarn color swap notes for each variation
| Variation | Swap | Effect |
|---|---|---|
| Black cat pumpkin | Replace white yarn with black | A moodier, more classic Halloween palette |
| Ghost kitten | Replace orange body/hat with white or pale grey | Turns the pumpkin body into a soft ghost shape |
| Witchy version | Swap the green bow for purple, add a small black hat instead of the pumpkin cap | Reads more “witch’s familiar” than “pumpkin patch” |
| Non-Halloween year-round kitty | Replace orange body with pastel pink or cream | A cuddly cat that works outside of October too |
Common mistakes and how to fix them
- Forgetting to track continuous rounds. Because this pattern works in continuous rounds rather than joined rounds, it’s easy to lose your place. Fix: always use a stitch marker in the first stitch of each round and move it up every time.
- Fastening off leg 2 by mistake. The pattern deliberately has you fasten off leg 1 but keep leg 2 live to join into the body. Fix: double check which leg you’re finishing before cutting yarn.
- Placing safety eyes too early. Eyes go in between R24 and R25 placing them before the head has enough rounds worked makes spacing guesswork. Fix: dry-fit the eyes without securing the backs first, check they’re centered and six stitches apart, then lock them in.
- Under-stuffing the head. A soft, floppy head is almost always under-stuffing, not a pattern problem. Fix: stuff firmly before working R31, checking by gently squeezing the head from both sides.
- Skipping the pumpkin-shaping thread. Without it, the body just looks like an orange ball, not a pumpkin. Fix: don’t treat this step as optional it’s what makes the whole piece read as “pumpkin” rather than “orange sphere.”
Care instructions for the finished piece
- Spot clean only. Because this piece is stuffed with polyester fiberfill and uses safety-eye hardware, avoid fully submerging it in water or machine washing.
- Use a damp cloth with a small amount of mild soap for surface marks, then air-dry completely before handling again.
- Keep away from direct sunlight for long stretches, since bright orange and brown yarn can fade over time.
- Store folded flat or standing in a box (not squashed under heavy items) during the off-season, so the stuffed shape doesn’t develop permanent dents.
- If it’s meant for a young child, remove or avoid safety eyes altogether and embroider the face instead — the same guidance applies to any amigurumi given to children under three.
More reader FAQ: trends, selling & profit from crochet
Are there any other free crochet patterns for Halloween blankets?
Yes — free pumpkin-motif and spider-web-motif crochet blanket patterns are widely available from independent designer blogs and Ravelry; searching “free pumpkin blanket crochet pattern” alongside “crochet halloween patterns free” will turn up several well-photographed options. What are some easy Halloween crochet patterns for a beginner?
Small amigurumi like this Hello Pumpkitten, simple granny-square pumpkins, and single-motif spider or bat appliqués are the easiest entry points — all use only basic stitches worked in rounds. Does Hobby Lobby or Michaels have free crochet patterns?
Both craft chains publish occasional free patterns on their own websites and in-store project cards, though selection is much smaller and less frequently updated than dedicated designer blogs or Ravelry. Is Hobby Lobby or Michaels better for crochet supplies?
Both carry comparable worsted weight yarn and standard hook sizes; the better choice usually comes down to which store is more convenient to you and which one currently has your preferred yarn brand in stock. What is the most profitable thing to crochet?
Small, fast-to-make amigurumi (like this Hello Pumpkitten), seasonal decor items, and simple accessories tend to sell well relative to their time investment, since customers pay a premium for handmade character and finish quality rather than sheer yarn quantity. What are the current crochet trends for 2026?
Seasonal amigurumi with strong “character” appeal — like this pumpkin-cat hybrid — continues to trend well, alongside textured stitch blankets and quick-make accessories designed for craft-fair and Etsy sales. Can I make a living selling crochet items?
Some crocheters do build a full income from it, but most successful sellers treat it as a supplemental income stream built around a recognizable style, consistent photography, and repeat customers rather than one-off sales. What crochet stuff sells the most, and what’s the most sold crochet item on Etsy?
Amigurumi characters, seasonal decor (exactly like this pumpkin kitty), and wearable accessories such as hats and scarves consistently rank among the best-selling crochet categories on marketplaces like Etsy.
Ready to grab your hook?
You now have the complete, free crochet Halloween pattern for the Hello Pumpkitten — every round, every stitch count, every photo. Print this page, pull out your worsted weight yarn, and start with Step 1: Arms.
Made one? Tag @foufiscrochet, the original pattern designer, so she can see your version — she genuinely loves seeing what people make.Start Stitching Now →
Final thoughts
Twenty years in, the patterns I come back to are the ones that respect your time — clear stitch counts, honest photos of the fiddly parts, and no missing steps. That’s what I’ve tried to hand you here: a genuinely complete, genuinely free crochet Halloween pattern you can trust round by round, not just a pretty photo with half the instructions missing. Whether you’re stitching the sweet version for a nursery shelf or the skeleton-faced version for a spookier mantel, this Hello Pumpkitten is proof that the best free crochet patterns don’t have to skimp on detail to stay free.
More Crochet Halloween Patterns Free to Explore
If you enjoyed this free crochet Halloween pattern, you’re going to want to bookmark this page — I regularly update it with more crochet halloween patterns free ideas, so it stays your go-to source whenever you need a new crochet halloween pattern free to stitch up. Whether you searched for free crochet halloween patterns for a quick weekend project or you’re hunting for crochet patterns halloween free to build out a whole themed collection, this Hello Pumpkitten guide is designed to be the most complete crochet halloween pattern free download you’ll find this season.
I get messages every October asking for more free halloween crochet patterns, and my answer is always the same: start with a small, well-tested crochet halloween patterns free project like this one before moving on to bigger blankets or garlands. A good free crochet pattern for halloween should always include a full materials list, an abbreviations chart, and stitch counts you can verify — exactly what you’ll find in every crochet halloween patterns free tutorial I publish here.
Looking for more seasonal inspiration beyond this crochet halloween patterns free pumpkin kitty? Here’s what I recommend searching next:
- Free crochet halloween patterns for amigurumi ghosts, bats, and spiders
- Crochet halloween pattern free options for garlands and bunting
- Free crochet patterns halloween blankets with pumpkin or web motifs
- Crochet halloween patterns free for beginner-friendly coasters and appliqués
- Free halloween crochet pattern ideas for trick-or-treat bag toppers
Every one of these follows the same rule I hold every crochet halloween patterns free tutorial to: clear rounds, honest photos, and stitch counts you can trust. That’s what separates a genuinely useful crochet halloween pattern free resource from the half-finished downloads floating around Pinterest. So if this Hello Pumpkitten pattern was your first stop, it won’t be your last — keep this page bookmarked as your home base for crochet halloween patterns free, and check back often as I add new free crochet halloween patterns throughout the season.
In short: this is a complete, free, expert-tested crochet halloween pattern you can return to again and again — and it’s just the first of many crochet halloween patterns free guides coming to this blog. Happy hooking!
One thing I always tell readers who land on a crochet halloween patterns free page for the first time: don’t stop at your first project. If this Hello Pumpkitten worked well for you, you’ll probably enjoy the other free crochet halloween patterns I’ve got planned for this blog — spiders, ghosts, and full crochet halloween pattern free garland sets are next on my list. A single free crochet pattern for halloween is a fun weekend, but a whole shelf of them is a tradition.
I also get asked whether these crochet halloween patterns free downloads work for craft fairs and Etsy shops — and yes, this particular crochet halloween pattern free design explicitly allows selling finished pieces, which makes it one of the more business-friendly free crochet halloween patterns out there compared to designs with stricter usage terms.
So whether you found this through a search for crochet halloween patterns free, a Pinterest pin, or a friend’s recommendation, the goal is the same: give you a crochet halloween pattern free resource you can actually finish, actually trust, and actually come back to. That’s the whole reason this free crochet halloween patterns project exists in the first place.
Before we get into the stitch-by-stitch instructions, I want to be clear about what makes this crochet halloween patterns free guide different from the dozens of other free crochet halloween patterns you’ll find with a quick search. Most crochet halloween pattern free downloads give you a photo and a vague ingredient list. This one gives you exact gram weights, exact hook sizes, and a stitch count after every single round — because a real free crochet pattern for halloween should never leave you guessing whether you miscounted three rounds ago.
If you’ve bookmarked this page because you searched crochet halloween patterns free and landed here, welcome — you’re in exactly the right place. And if you’re the kind of crocheter who collects free halloween crochet patterns the way other people collect cookbooks, stick around, because this crochet halloween pattern free library is only going to grow from here.
![Amigurumi Crochet Pattern HALLOWEEN doll – [finished doll / head and body / legs and shoes / ruffled dress / witch hat / curly wig]](https://crochetloversclub.com/wp-content/uploads/2026/08/Crochet_witch_doll_sitting_202608271734-768x768.jpeg)


