

Bandana Crochet Pattern Free | Easy Triangle Bandana Scarf Tutorial
Free Pattern · Beginner Friendly · US Terms
Bandana Crochet Pattern Free: The Complete Triangle Bandana Guide
A simple bandana crochet pattern free for every skill level — written row by row, exactly as tested
Hi, I’m your crochet guide for today, and I’ve been designing and teaching crochet patterns for over 20 years. In that time, one request has landed in my inbox more than almost any other: “Can you share a bandana crochet pattern free of charge, that actually works the first time?” So that’s exactly what this post is. Below you’ll find a genuinely free crochet bandana pattern PDF-style guide, written out in full, with every abbreviation explained and every row counted for you.
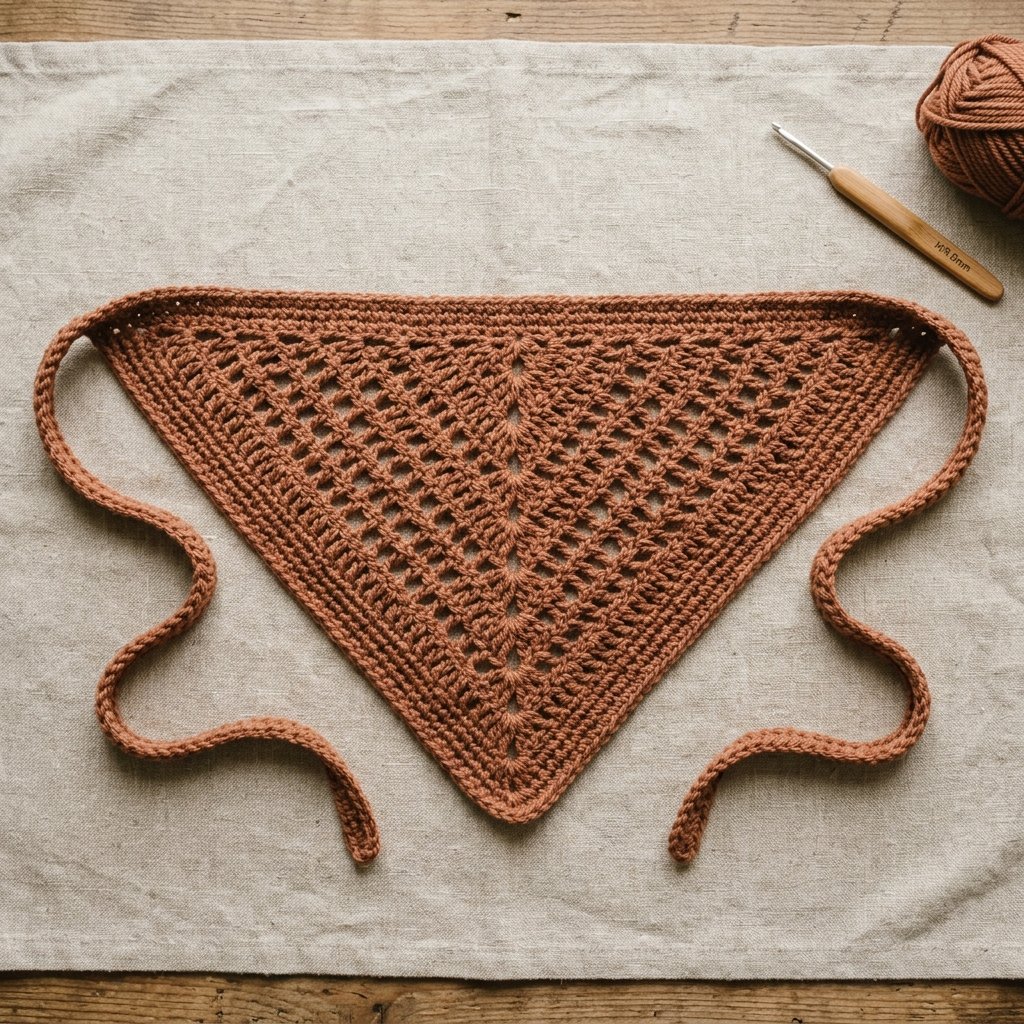
This is a simple bandana crochet pattern free project built on a classic granny-style triangle, worked from a magic ring outward in a lacy V-stitch, then finished with two long ties and a clean single crochet border. If you’ve been searching for a crochet lace bandana pattern free tutorial, a crochet head scarf pattern free download, or even a wildflower bandana crochet pattern free version you can customize with color changes, this pattern is your starting point.
Why This Bandana Crochet Pattern Free Guide Works
Unlike a lot of scarf or headwear patterns online, this bandana crochet pattern free tutorial doesn’t rely on complicated shaping or hard-to-follow charts. It’s built entirely on double crochet (DC), treble crochet (Tr), and chain spaces (Ch), which makes it genuinely approachable if you’re newer to the craft but still comfortable with basic stitches. It’s also endlessly adjustable — because the bandana size can be changed just by adding or removing rows, this single free crochet bandana pattern PDF-style guide can become a baby bandana bib, a toddler headscarf, or a full adult-sized bandana simply by working more or fewer rows.
Materials You’ll Need
| Item | Exact Amount / Spec |
|---|---|
| Yarn (any weight 3 or 4 — DK/worsted) | Approx. 100–150 grams (one 100g skein covers a child-size bandana; keep a second skein on hand for adult sizing or color-blocked “wildflower” variations) |
| Crochet hook | 6 mm (US size J-10) |
| Tapestry needle | 1, for weaving in ends |
| Scissors | 1 pair |
| Stitch marker (optional but recommended) | 1, to mark the start of each row |
Pattern Notes
- This pattern is written in US crochet terms.
- Bandana size can be adjusted by taking away or adding rows — this is what makes it such a flexible, simple bandana crochet pattern free of restrictions on sizing.
Abbreviations
| Abbreviation | Meaning |
|---|---|
| Ch | Chain |
| DC | Double Crochet |
| Tr | Treble |
| SC | Single Crochet |
| Sl St | Slip Stitch |
| Sp | Space |
| * * | Repeat what’s in between |
Step-by-Step Construction: The Bandana Crochet Pattern, Free & Row-by-Row
Below is the exact bandana crochet pattern free instructions, transcribed row by row so you can follow along without flipping between images.
Foundation: Make a Magic Ring
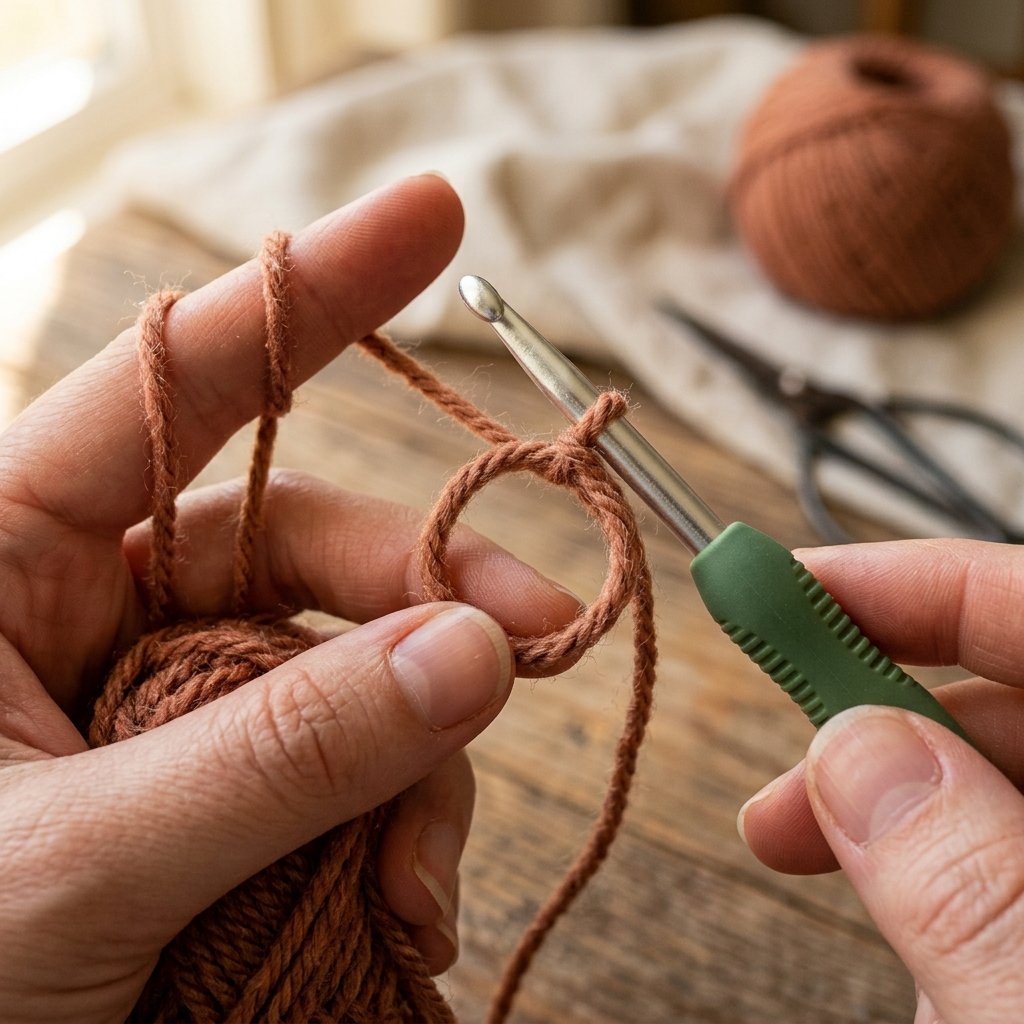
Row 1 2 DC groups, 2 Tr
Working inside ring, Ch 5, DC, Ch 1, Tr, Ch 1, DC, Ch 1, Tr, turn.
TR DC CH1 CH1 DC \ | | / \ | | / CH1 \ | | / (magic ring) / \ TR CH5
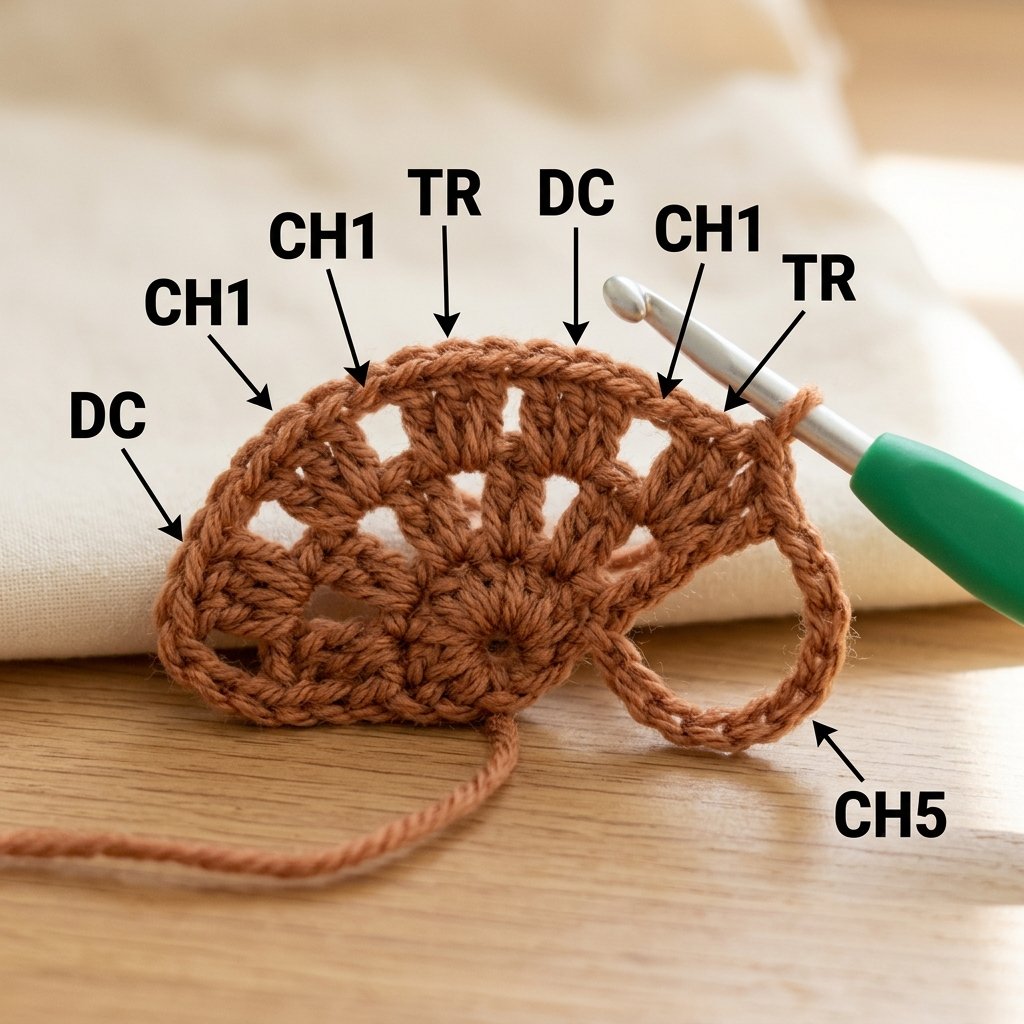
Row 2 Fan widens by one repeat
Ch 5, DC in Ch 1 sp, Ch 1, DC in next DC, Ch 1, (DC, Ch 1, Tr, Ch 1, DC) in Tr from previous row, Ch 1, DC in next DC, Ch 1, (DC, Ch 1, Tr) in 3rd Ch of Ch 5, turn.
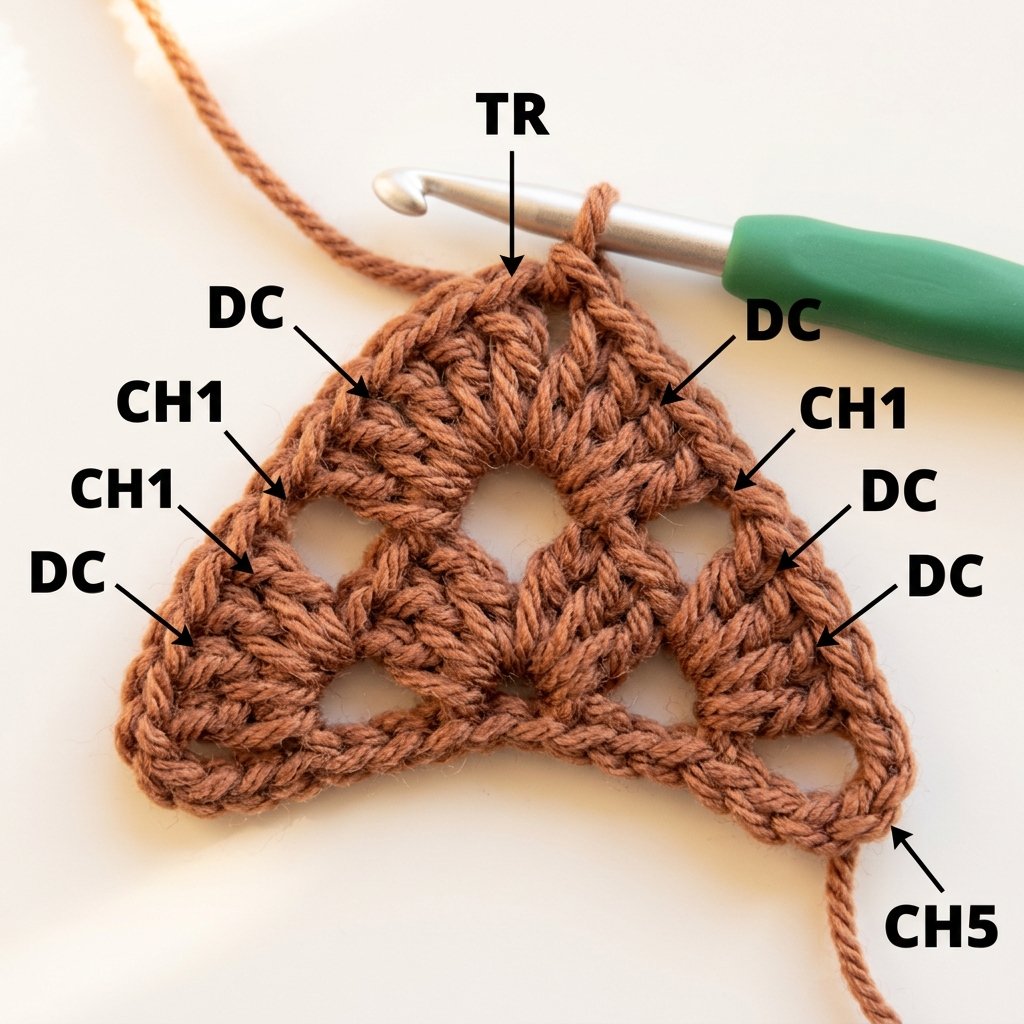
Row 3 Establishes the repeat pattern for all following rows
Ch 5, DC in Ch 1 sp, * Ch 1, DC in next DC* repeat *to* until Tr, (DC, Ch 1, Tr, Ch 1, DC) in Tr from previous row, * Ch 1, DC in next DC* repeat *to* until Ch 5 sp, (DC, Ch 1, Tr) in 3rd Ch of Ch 5 sp, turn.
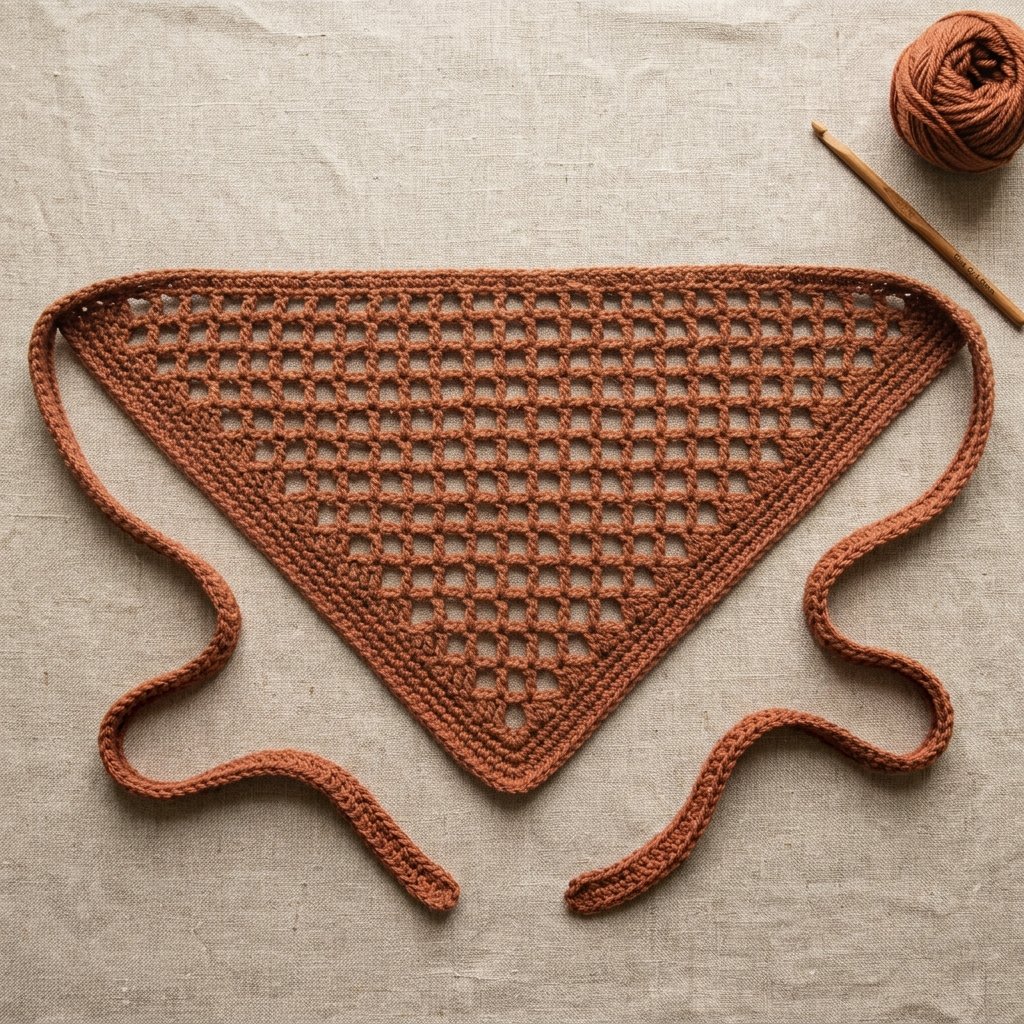
Rows 4–11: Repeat Row 3
Repeat Row 3 until Row 11. Each repeat adds one more DC/Ch 1 pair on either side of the center Tr, growing the triangle evenly. This is exactly where you can shorten or lengthen your bandana crochet pattern free of a fixed size — stop at Row 9 for a smaller/child bandana, or continue past Row 11 for an oversized adult wrap.
💡 Tip: Count your DC/Ch 1 “V” pairs on one side after every row and jot the number down (or use a stitch marker) — this is the easiest way to catch a missed repeat before it’s several rows old.
Straps / Border
After last row, Ch 51, Sl St into 2nd Ch from hook and into each Ch, SC around triangle until opposite point of first strap, Ch 51, Sl St into 2nd Ch from hook and into each Ch, SC along straight edge of bandana, Sl St into 1st Ch of 1st strap.
Finishing & Blocking (No Stuffing Needed)
Because this is a flat, open bandana rather than an amigurumi or stuffed toy, there’s no stuffing stage in this project — instead, focus your finishing time on these steps:
- Weave in ends: Thread every yarn tail onto your tapestry needle and weave it through 4–5 stitches on the wrong side.
- Steam or wet-block: Pin the triangle out to your intended finished dimensions on a towel or blocking mat, lightly mist with water (or hover a steamer 2–3 inches above the surface), and let it dry fully before unpinning. Blocking opens up the lace pattern and squares off the straps.
- Check strap length: Try the bandana on before final blocking — if the 51-chain ties feel short or long for your head size, this is the moment to add or unravel a few chains.
Estimated Time to Complete (Beginner)
For a beginner working at a relaxed pace, this bandana crochet pattern free project typically takes 2.5–4 hours total, usually spread across two or three short sessions: about 20 minutes for the magic ring and Rows 1–3, roughly 1.5–2.5 hours for Rows 4–11, and another 30–40 minutes for the straps and border.
Common Mistakes and How to Fix Them
| Mistake | How to Fix It |
|---|---|
| Triangle edges curl or ruffle | You’re likely adding an extra Ch 1 or DC somewhere in the repeat — go back to Row 3’s *to* repeat and recount your DC/Ch1 pairs on each side. |
| Center point looks lopsided | Make sure the (DC, Ch 1, Tr, Ch 1, DC) group is worked entirely into the Tr stitch from the previous row, not split across two stitches. |
| Straps twist when you chain 51 | Keep your working yarn untwisted as you chain, and don’t pull the chain too tight — a slightly relaxed Ch 51 slip-stitches back through more evenly. |
| Bandana ends up too small or too large | Remember the size is fully adjustable — stop the Row 3 repeat earlier for smaller, or continue past Row 11 for larger, exactly as noted in the pattern. |
| Losing your place mid-row | Place a stitch marker at the start of every row and count your Ch1 spaces out loud as you go — it feels slow at first but saves frogging later. |
Troubleshooting Section
My fan/triangle isn’t opening up into a “V” shape.
Check your tension on the Ch 1 spaces — if they’re pulled too tight, the lace won’t open. Try going up half a hook size, or consciously leave the chain stitches a touch looser.
The 3rd Ch of my Ch 5 is hard to find.
Turn your work so the Ch 5 loop is facing you and count from the hook: the 3rd chain is the one nearest the base of the loop, not the one right next to your hook.
My row counts don’t match the stitch counts shown.
This is almost always a skipped or doubled Ch 1 space in the *to* repeat of Row 3 — unravel back to the last row where your V-pairs were even on both sides and rework from there.
Yarn Color Swap Notes for Variations
- Classic solid bandana: Work the entire bandana crochet pattern free guide in a single worsted-weight color for a clean, minimalist look.
- Wildflower bandana crochet pattern free-style: Change yarn color every 2–3 rows starting at Row 4, using soft florals (sage, blush, cream, dusty lilac) to build a gradient “wildflower field” effect toward the point.
- Two-tone border: Work Rows 1–11 in your main color, then switch colors for the SC border and straps for contrast.
- Baby/child version: Use a lighter DK-weight yarn and stop the Row 3 repeat around Row 7–8 for a soft, lightweight head or bib scarf.
Care Instructions for the Finished Bandana
- Hand wash in cool water with a mild wool/delicate detergent if using natural fibers; machine wash gentle/cold if using acrylic.
- Never wring — press out excess water in a towel instead.
- Lay flat to dry on a towel, re-pinning to your blocked dimensions to keep the lace triangle crisp.
- Store folded flat rather than hung, to prevent the straps from stretching out of shape.
Frequently Asked Questions
Where can I find a simple bandana crochet pattern free of charge like this one?
Right here — everything above is the full, free pattern from magic ring through straps and border, with no paywall or sign-up required.
Is there a free crochet bandana pattern PDF version of this?
The instructions above are written in the same complete, row-by-row format you’d expect from a free crochet bandana pattern PDF — simply print this page or save it to your device to use as your printable reference.
Is this a free crochet bandana pattern PDF for beginners specifically?
Yes. Every stitch is defined in the abbreviations chart, each row is spelled out in full (not just charted), and the troubleshooting section is built specifically for beginner sticking points — making this a genuine free crochet bandana pattern PDF for beginners.
Is this considered a crochet lace bandana pattern free tutorial?
Yes — the open V-stitch and chain-space construction used from Row 1 onward is a classic openwork lace technique, so this qualifies as a crochet lace bandana pattern free design.
Can I use this as a crochet head scarf pattern free alternative to buying one?
Absolutely. Once blocked, this bandana functions as a full crochet head scarf pattern free option — tie it under your hair at the nape of the neck, or tie the straps at the front bandana-style.
How do I turn this into a wildflower bandana crochet pattern free variation?
Follow the exact same rows and stitch counts, but change yarn colors every 2–3 rows starting at Row 4 (see the Yarn Color Swap Notes above) to build a soft, floral gradient effect toward the center point.
What size hook and yarn does this bandana crochet pattern free tutorial use?
A 6 mm hook with any weight 3 (DK) or weight 4 (worsted/aran) yarn, roughly 100–150 grams depending on your finished size. Bandana Crochet Pattern Free · Written and tested for makers of every skill level


