Crochet Baby Shoes: The Complete “Baby Air Jordans” Pattern (Free & Beginner-Friendly)
Crochet Baby Shoes: The Complete “Baby Air Jordans” Pattern (Free & Beginner-Friendly)
Amigurumi & Baby Pattern Series
Crochet Baby Shoes: The Full “Baby Air Jordans” Pattern, Step by Step
A complete, beginner-friendly crochet baby shoes tutorial with every round, every stitch count, and every photo you need to make these tiny sneakers yourself.
The finished project: crochet baby shoes styled like a classic red-and-white high-top sneaker.
✂️
Written by a Crochet Pattern Designer, 20+ Years Experience
Specialist in amigurumi & crochet baby shoes construction
I have been designing crochet patterns for two decades, and if there is one project that never stops trending in my inbox, it is crochet baby shoes. Every week someone asks me the same thing: “can you show me exactly how to make crochet baby shoes that actually look like real sneakers?” So today, I’m walking you through my full crochet baby shoes pattern the one I call “Baby Air Jordans” from the very first chain to the final laced bow.
This isn’t a vague overview. This is the complete, round-by-round crochet baby shoes pattern with stitch counts, photos for every stage, and answers to the exact questions people search for most about crochet baby shoes. Grab your hook let’s make something a baby (and their parents) will actually keep forever.
What’s inside this crochet baby shoes guide
- Why crochet baby shoes make the best handmade gift
- Materials & tools for crochet baby shoes
- Abbreviations chart
- Step 1 — Crocheting the sole
- Step 2 — Sole upper & toe
- Step 3 — The upper & tongue
- Step 4 — Trim, heel & assembly
- Step 5 — Nike-style brand detail & laces
- Finishing & care instructions
- Troubleshooting common mistakes
- Crochet baby shoes: frequently asked questions
Why Crochet Baby Shoes Make the Best Handmade Gift
Of all the amigurumi and baby items I’ve designed, crochet baby shoes are consistently the most requested. They’re small, so they crochet up fast, but they look incredibly impressive — a finished pair of crochet baby shoes genuinely looks like a miniature real sneaker, which makes people assume it took much longer than it did.
Expert tip: If you’ve never made crochet baby shoes before, start with the 0–3 months size. It’s the fastest way to learn the shaping before you commit to a bigger pair.
Beyond the “wow factor,” crochet baby shoes are also one of the most practical baby crochet gifts because they use so little yarn — you can usually make a full pair from scrap amounts of worsted weight cotton. That’s exactly why this crochet baby shoes pattern is written the way it is: precise, no guessing, and photographed at every single stage.
Materials & Tools for Crochet Baby Shoes
Here is everything you need before you start this crochet baby shoes project. I always recommend laying out your yarn colors first — it saves you from digging through your stash mid-round.
| Item | Detail |
|---|---|
| Main Color (MC) — Red | Worsted weight cotton, approx. 15–20 grams (for sole & trim details) |
| White | Worsted weight cotton, approx. 20–25 grams (for toe & upper) |
| Black | Small amount, approx. 3–5 grams (for laces, brand logo & sole trim) |
| Yarn brand used | Catania Originals by Schachenmayr — cotton, combed, gassed, mercerised, Weight 2 (fine): 50g = 125m / 1.75oz = 137yds |
| Crochet hook | 2.5mm (or size needed to obtain gauge) |
| Gauge | 11 rows of 10 Sc = 5cm |
| Scissors | 1 pair, small sharp embroidery scissors work best |
| Yarn/tapestry needle | 1, for sewing pieces together and weaving in ends |
| Stitch markers | 2–3 (locking markers, to track rounds and mark points as instructed) |
| Measuring tape | 1, to check sole length against sizing chart below |
Sole length by size for crochet baby shoes:
| Baby age | Sole length |
|---|---|
| 0–3 months | 9 cm |
| 3–6 months | 10 cm |
| 6–9 months | 11 cm |
| 9–12 months | 12 cm |
Rather than crocheting a test swatch, the fastest way to check your gauge on crochet baby shoes is to make the sole first. Measure it against the chart — too big, size your hook down; too small, size your hook up.
Crochet Baby Shoes — Abbreviations Chart
| Abbreviation | Meaning |
|---|---|
| St(s) | Stitch(es) |
| SlSt | Slip stitch |
| Ch | Chain |
| Sc | Single crochet |
| Hdc | Half double crochet |
| Dc | Double crochet |
| Sc tog | Single crochet worked together (decrease) |
| Dc tog | Double crochet worked together (decrease) |
| Sc BLO | Single crochet worked in the Back Loop Only |
| Sc FLO | Single crochet worked in the Front Loop Only |
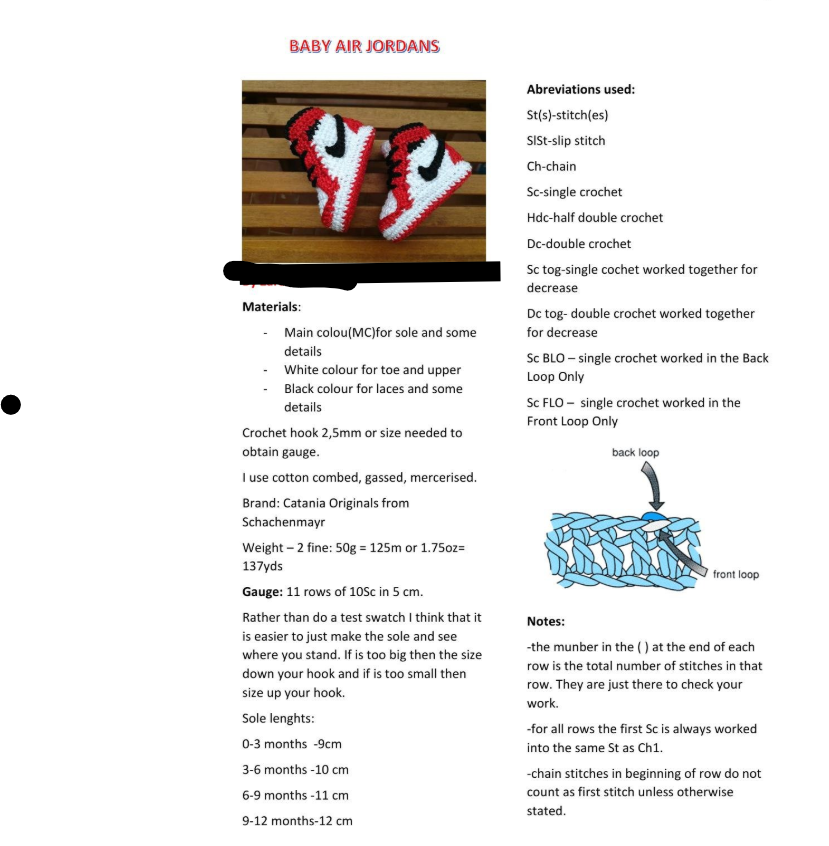
Front loop vs. back loop — this comes up constantly in this crochet baby shoes pattern, so keep this picture handy.
Reading the pattern: Brackets [ ] mean work everything inside them as many times as instructed. A number before a stitch (e.g. “10Sc”) means work that stitch across that many stitches. The number in parentheses at the end of a row/round is your total stitch count — always check it before moving on in this crochet baby shoes pattern.
⏱️ Beginner time: 6–9 hours per shoe🧶 Skill level: Advanced beginner📏 Size shown: 0–3 months
Step 1 — Crocheting the Sole (Size 0–3 months, 9cm)
The oval sole chart used for these crochet baby shoes.
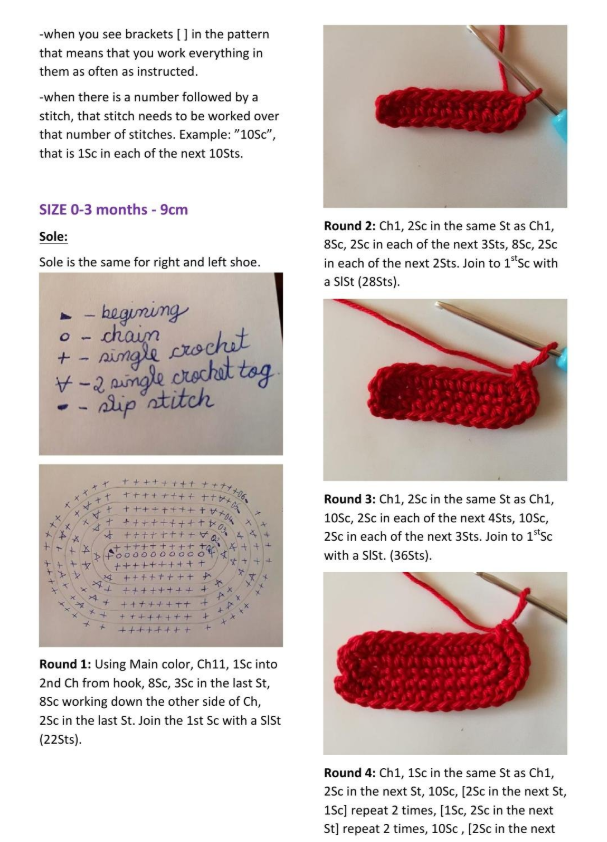
Round 122 Sts
Using Main color, Ch11, 1Sc into 2nd Ch from hook, 8Sc, 3Sc in the last St, 8Sc working down the other side of Ch, 2Sc in the last St. Join the 1st Sc with a SlSt.
Round 228 Sts
Ch1, 2Sc in the same St as Ch1, 8Sc, 2Sc in each of the next 3Sts, 8Sc, 2Sc in each of the next 2Sts. Join to 1st Sc with a SlSt.
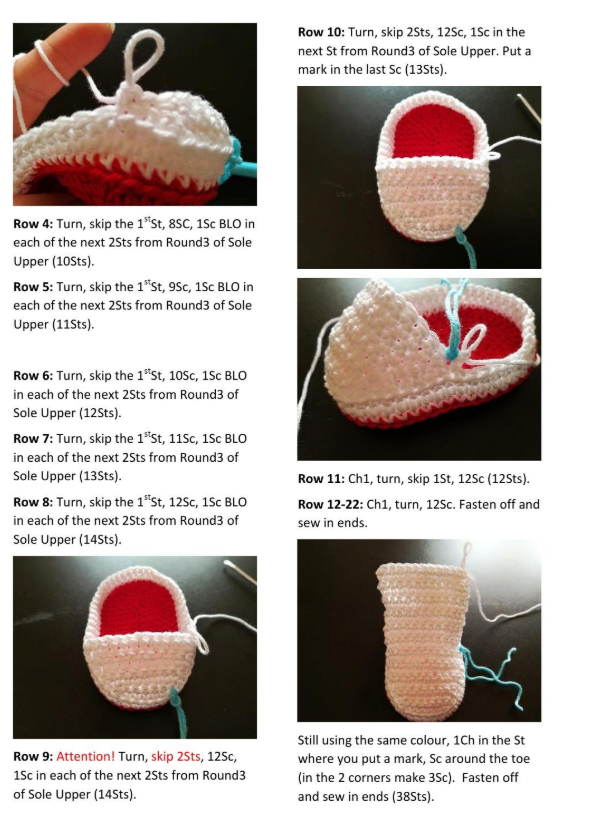
Round 336 Sts
Ch1, 2Sc in the same St as Ch1, 10Sc, 2Sc in each of the next 4Sts, 10Sc, 2Sc in each of the next 3Sts. Join to 1st Sc with a SlSt.
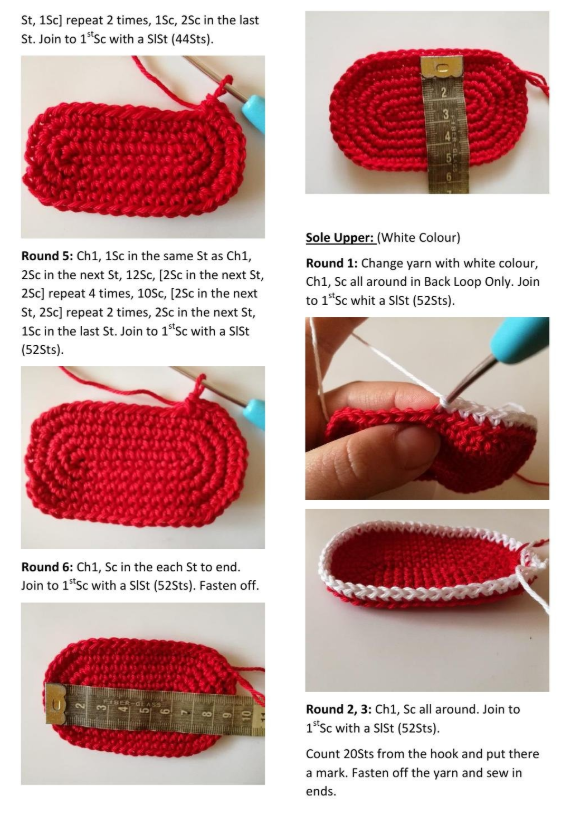
Round 444 Sts
Ch1, 1Sc in the same St as Ch1, 2Sc in the next St, 10Sc, [2Sc in the next St, 1Sc] repeat 2 times, [1Sc, 2Sc in the next St] repeat 2 times, 10Sc, [2Sc in the next St, 1Sc] repeat 2 times, 1Sc, 2Sc in the last St. Join to 1st Sc with a SlSt.
Round 552 Sts
Ch1, 1Sc in the same St as Ch1, 2Sc in the next St, 12Sc, [2Sc in the next St, 2Sc] repeat 4 times, 10Sc, [2Sc in the next St, 2Sc] repeat 2 times, 2Sc in the next St, 1Sc in the last St. Join to 1st Sc with a SlSt.
Round 652 Sts — fasten off
Ch1, Sc in each St to end. Join to 1st Sc with a SlSt. Fasten off.
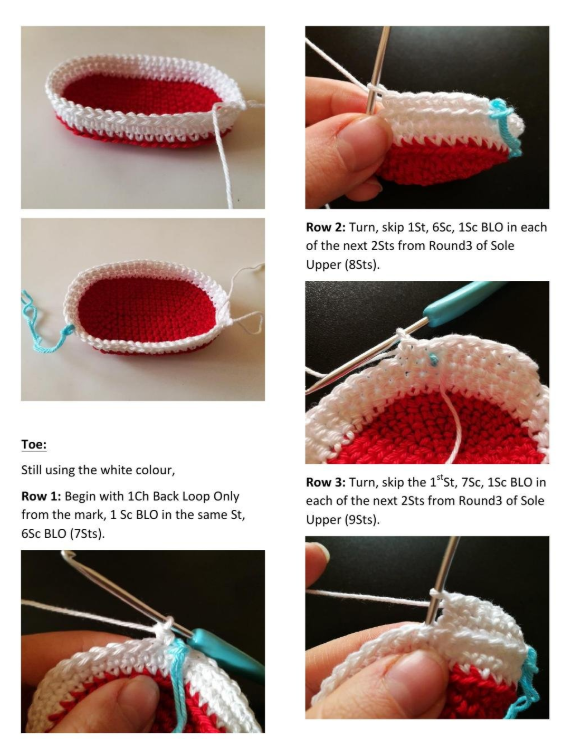
Measuring the finished sole — it should read close to 9cm for the 0–3 months crochet baby shoes size.
Step 2 — Sole Upper & Toe
Now we build the white “midsole” rim and the toe box of our crochet baby shoes.
Sole Upper — Round 1 (White)52 Sts
Change yarn to white colour, Ch1, Sc all around in Back Loop Only. Join to 1st Sc with a SlSt.
Sole Upper — Rounds 2 & 352 Sts
Ch1, Sc all around. Join to 1st Sc with a SlSt. Count 20 stitches from the hook and place a stitch marker there. Fasten off yarn and weave in ends.
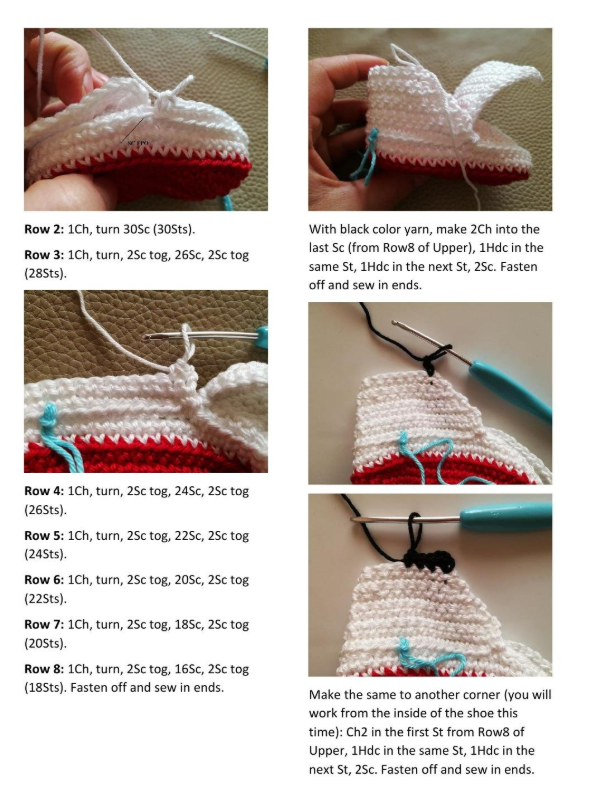
Marking your 20th stitch here is critical — every later round of this crochet baby shoes pattern references that marked point.
Toe (White, worked flat in short rows)
Row 17 Sts
Begin with 1Ch Back Loop Only from the mark, 1 Sc BLO in the same St, 6Sc BLO.
Row 28 Sts
Turn, skip 1St, 6Sc, 1Sc BLO in each of the next 2Sts from Round 3 of Sole Upper.
Row 39 Sts
Turn, skip the 1st St, 7Sc, 1Sc BLO in each of the next 2Sts from Round 3 of Sole Upper.
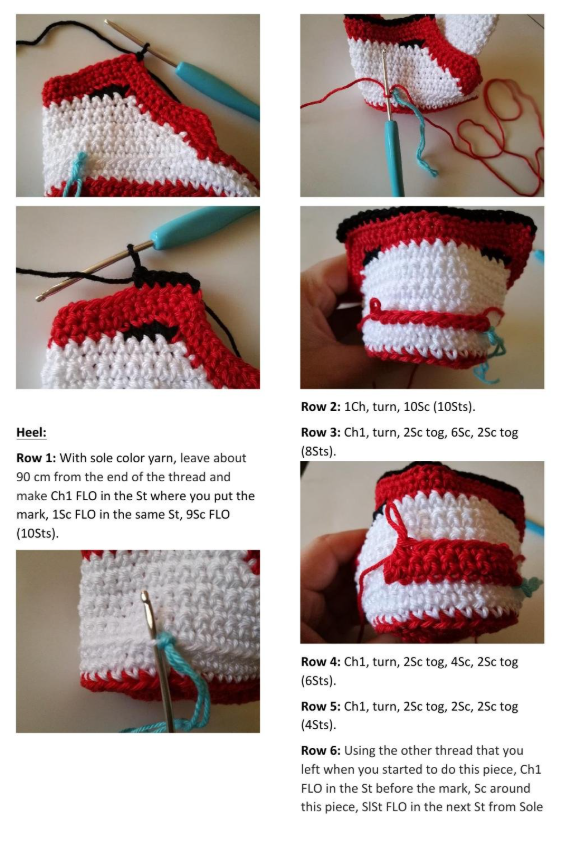
Row 410 Sts
Turn, skip the 1st St, 8Sc, 1Sc BLO in each of the next 2Sts from Round 3 of Sole Upper.
Row 511 Sts
Turn, skip the 1st St, 9Sc, 1Sc BLO in each of the next 2Sts from Round 3 of Sole Upper.
Row 612 Sts
Turn, skip the 1st St, 10Sc, 1Sc BLO in each of the next 2Sts from Round 3 of Sole Upper.
Row 713 Sts
Turn, skip the 1st St, 11Sc, 1Sc BLO in each of the next 2Sts from Round 3 of Sole Upper.
Row 814 Sts
Turn, skip the 1st St, 12Sc, 1Sc BLO in each of the next 2Sts from Round 3 of Sole Upper.
Row 9 — Attention!14 Sts
Turn, skip 2Sts, 12Sc, 1Sc in each of the next 2Sts from Round 3 of Sole Upper.
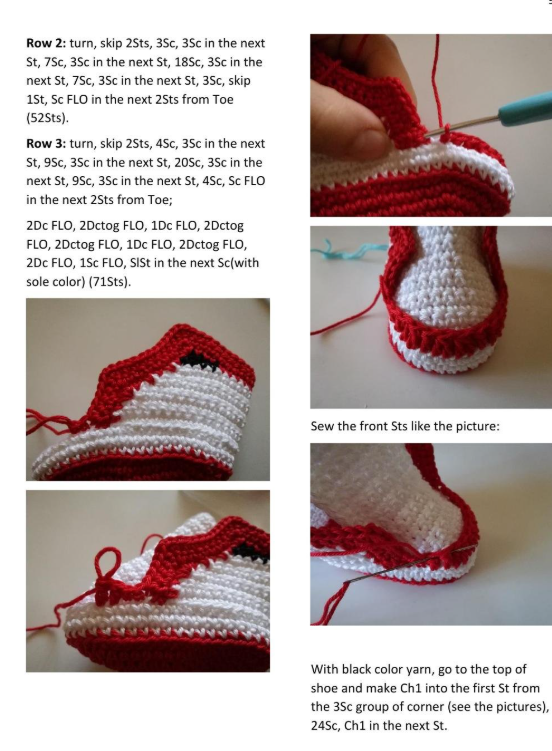
Row 1013 Sts — place marker
Turn, skip 2Sts, 12Sc, 1Sc in the next St from Round 3 of Sole Upper. Put a marker in the last Sc.
Row 1112 Sts
Ch1, turn, skip 1St, 12Sc.
Rows 12–2212 Sts each
Ch1, turn, 12Sc across each row. Fasten off and weave in ends.
Toe edge final round38 Sts
Still using the same colour, 1Ch in the St where you placed the mark, Sc around the toe (in the 2 corners make 3Sc). Fasten off and weave in ends.
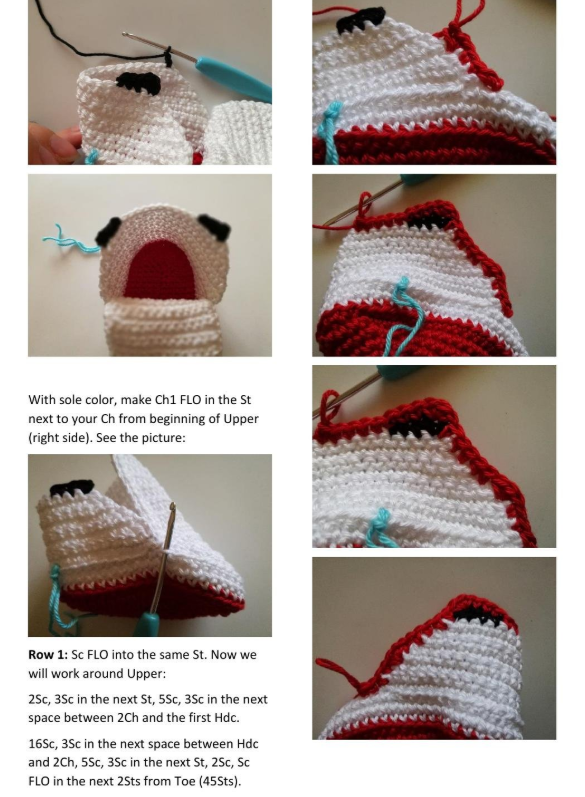
Step 3 — The Upper & Tongue
This is where your crochet baby shoes start to really look like a sneaker.
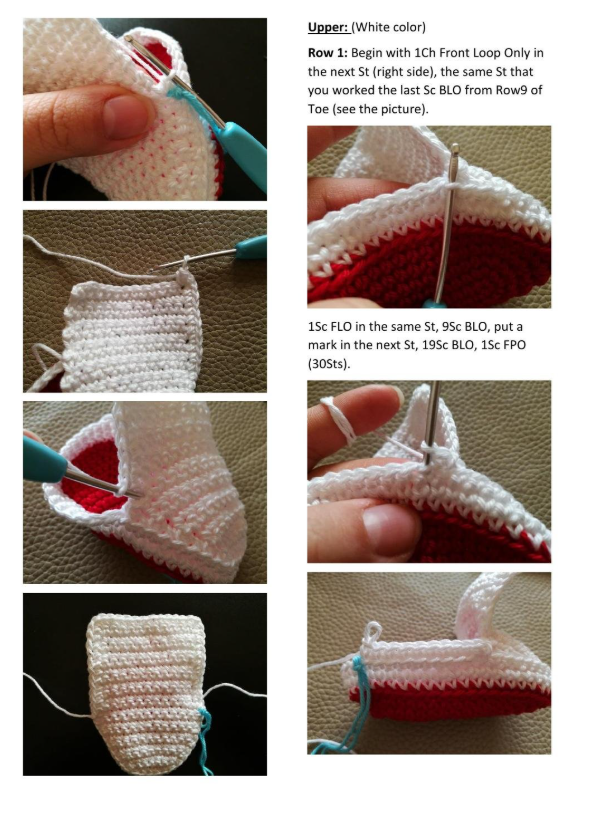
Upper Row 1 (White)30 Sts
Begin with 1Ch Front Loop Only in the next St (right side), the same St where you worked the last Sc BLO from Row 9 of the Toe. 1Sc FLO in the same St, 9Sc BLO, put a marker in the next St, 19Sc BLO, 1Sc FPO.
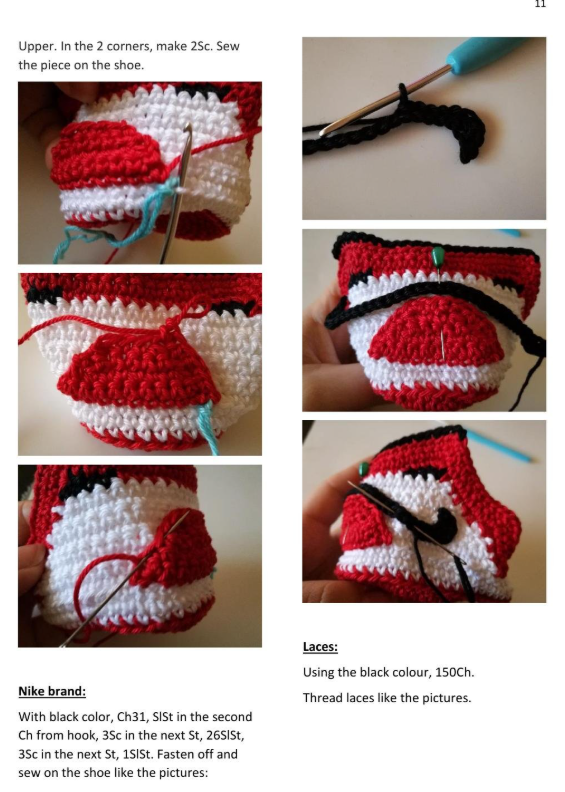
Row 230 Sts
1Ch, turn, 30Sc.
Row 328 Sts
1Ch, turn, 2Sc tog, 26Sc, 2Sc tog.
Row 426 Sts
1Ch, turn, 2Sc tog, 24Sc, 2Sc tog.
Row 524 Sts
1Ch, turn, 2Sc tog, 22Sc, 2Sc tog.
Row 622 Sts
1Ch, turn, 2Sc tog, 20Sc, 2Sc tog.
Row 720 Sts
1Ch, turn, 2Sc tog, 18Sc, 2Sc tog.
Row 818 Sts — fasten off
1Ch, turn, 2Sc tog, 16Sc, 2Sc tog. Fasten off and weave in ends.
Ankle corner detail: With black colour yarn, make 2Ch into the last Sc (from Row 8 of Upper), 1Hdc in the same St, 1Hdc in the next St, 2Sc. Fasten off and sew in ends. Repeat the same on the other corner, working from the inside of the shoe this time: Ch2 in the first St from Row 8 of Upper, 1Hdc in the same St, 1Hdc in the next St, 2Sc. Fasten off and sew in ends.
Step 4 — Trim, Heel & Assembly
Sole-colour trim around Upper — Row 145 Sts
With sole colour, make Ch1 FLO in the St next to your Ch from the beginning of Upper (right side). Sc FLO into the same St. Now work around the Upper: 2Sc, 3Sc in the next St, 5Sc, 3Sc in the next space between 2Ch and the first Hdc. 16Sc, 3Sc in the next space between Hdc and 2Ch, 5Sc, 3Sc in the next St, 2Sc, Sc FLO in the next 2Sts from Toe.
Row 252 Sts
Turn, skip 2Sts, 3Sc, 3Sc in the next St, 7Sc, 3Sc in the next St, 18Sc, 3Sc in the next St, 7Sc, 3Sc in the next St, 3Sc, skip 1St, Sc FLO in the next 2Sts from Toe.
Row 371 Sts
Turn, skip 2Sts, 4Sc, 3Sc in the next St, 9Sc, 3Sc in the next St, 20Sc, 3Sc in the next St, 9Sc, 3Sc in the next St, 4Sc, Sc FLO in the next 2Sts from Toe; then 2Dc FLO, 2Dctog FLO, 1Dc FLO, 2Dctog FLO, 2Dctog FLO, 1Dc FLO, 2Dctog FLO, 2Dc FLO, 1Sc FLO, SlSt in the next Sc (with sole colour).
Sew the front stitches down as shown in the photos below so the little “vamp” seam of your crochet baby shoes lies flat.
Heel — Row 1 (Sole colour)10 Sts
Leave about 90cm from the end of the thread and make Ch1 FLO in the St where you put the mark, 1Sc FLO in the same St, 9Sc FLO.
Row 210 Sts
1Ch, turn, 10Sc.
Row 38 Sts
Ch1, turn, 2Sc tog, 6Sc, 2Sc tog.
Row 46 Sts
Ch1, turn, 2Sc tog, 4Sc, 2Sc tog.
Row 54 Sts
Ch1, turn, 2Sc tog, 2Sc, 2Sc tog.
Row 6 assemble
Using the other thread you left when starting this piece, Ch1 FLO in the St before the mark, Sc around this piece, SlSt FLO in the next St from Sole Upper. In the 2 corners, make 2Sc. Sew the heel piece onto the shoe.
Step 5 Nike-Style Brand Detail & Laces
Brand swoosh
With black colour, Ch31, SlSt in the second Ch from hook, 3Sc in the next St, 26SlSt, 3Sc in the next St, 1SlSt. Fasten off and sew onto the shoe as shown in the photos.
Laces
Using the black colour, Ch150. Thread the laces through the eyelets on your crochet baby shoes like the reference photos, then tie a bow at the front.
Finishing & Care Instructions for Crochet Baby Shoes
- Weave in every end tightly and trim close — babies’ hands and mouths find loose ends fast, so this matters more on crochet baby shoes than almost any other project.
- Block lightly if the sole looks uneven: dampen slightly and shape by hand, then let dry flat.
- Washing: hand wash in cool water with mild soap; cotton yarn like Catania holds its shape well. Do not wring — press out water in a towel and lay flat to dry.
- Storage: keep crochet baby shoes stuffed lightly with tissue paper between wears to help them hold their sneaker shape.
- Avoid the dryer — heat can felt or shrink cotton yarn and distort the sole shape of your crochet baby shoes.
Troubleshooting: Common Mistakes with Crochet Baby Shoes
My sole is ruffling or cupping
You likely added too many increases for your gauge. Recount your stitches at the end of each round — the numbers in parentheses in this crochet baby shoes pattern are not optional, they’re your checkpoint.
My toe box doesn’t line up with my sole upper
This almost always traces back to the 20-stitch marker placed after Sole Upper Round 3. If that marker shifts even one stitch, the whole toe shaping of your crochet baby shoes will be off — go back and recheck it before continuing.
The ankle opening is too tight/loose
Adjust your hook size half a millimeter up or down on the Upper section only — this won’t affect the sole sizing chart for your crochet baby shoes.
My stitch count is off by 1 or 2
Check whether you worked the first Sc into the same stitch as your Ch1 — this pattern instructs that for all rows, and skipping it is the #1 cause of drifting counts in crochet baby shoes patterns.
Yarn Color Swap Notes
Want to make your own colorway of these crochet baby shoes? Simply swap Main Color, White, and Black for any three worsted-weight cotton colors of your choice — the construction stays identical. Popular swaps: navy + white + red (classic sneaker look), black + white + gray, or pastel pink + white + gold for a girl’s version of these crochet baby shoes.
Ready to make your own pair?
Save this crochet baby shoes pattern, grab your 2.5mm hook, and start with the sole — you’ll have a finished pair faster than you think.Back to Materials List ↑
Crochet Baby Shoes: Frequently Asked Questions
How long does it take to crochet baby shoes?
For a confident beginner, one shoe in this crochet baby shoes pattern takes roughly 6–9 hours, since it involves the sole, toe, upper, heel, trim, and finishing details. Experienced crocheters can often finish a pair of crochet baby shoes in one evening. What can I crochet in 2 hours?
Small amigurumi accessories, simple beanies, or a single flat sole (like the one in this crochet baby shoes pattern) are realistic in about 2 hours. The full crochet baby shoes project takes longer because of the layered construction. Are baby booties easy to crochet for beginners?
Basic baby booties are beginner-friendly, but detailed crochet baby shoes like this sneaker-style pattern are better suited to an “advanced beginner” who is already comfortable with increases, decreases, and working in the front/back loop only. How long does the average crochet project take?
It depends entirely on complexity — a simple scarf might take a few hours, while detailed items like these crochet baby shoes, with multiple colors and construction steps, take several hours per shoe. Can you provide a pattern for crocheting baby shoes?
Yes — this entire article is the full pattern, from the sole through the laces, for making these exact red, white, and black crochet baby shoes. What is the easiest baby item to crochet?
A simple hat or a plain single-color bootie is easier than these detailed sneaker-style crochet baby shoes, which involve color changes, Front/Back Loop Only work, and shaping. How do I make baby shoes at home with crochet?
You need worsted weight cotton yarn in your chosen colors, a 2.5mm hook, a needle, and scissors. Follow the sole, sole upper, toe, upper, heel, and trim steps in order, exactly as laid out in this crochet baby shoes pattern. What is the best yarn to use for crocheting baby shoes?
Mercerised cotton, like the Catania Originals used here, is ideal for crochet baby shoes — it holds stitch definition well, is soft on baby skin, and machine washes reasonably well when hand-washed gently. What yarn is not safe for babies?
Avoid mohair, novelty/eyelash yarns, or anything that sheds fibers, since these can be a choking or irritation hazard on crochet baby shoes and other baby items. Also avoid scratchy wool blends directly against skin. Is 100% cotton yarn safe for babies?
Yes, 100% cotton is one of the safest and most popular choices for crochet baby shoes because it’s breathable, machine washable in most cases, and free of the fuzz/shedding concerns of some other fibers. Is there a difference between regular yarn and baby yarn?
“Baby yarn” usually just refers to soft, fine-weight yarns marketed for baby items; there’s no strict rule, but for crochet baby shoes look for smooth, soft, machine-washable fibers like mercerised cotton or baby-specific acrylic blends. What size crochet hook is used for baby shoes?
This crochet baby shoes pattern uses a 2.5mm hook with fine-weight (weight 2) cotton yarn, but you should always size up or down to match your personal gauge against the sole measurements. What are the typical measurements for baby booties?
For crochet baby shoes, sole length is the key measurement: 9cm for 0–3 months, 10cm for 3–6 months, 11cm for 6–9 months, and 12cm for 9–12 months. How much yarn do you need for baby booties?
A single pair of crochet baby shoes in this pattern typically uses about 15–20g of red, 20–25g of white, and 3–5g of black worsted-weight cotton — small enough to use up leftover yarn from your stash. What size booties fit a 6-month-old?
Most 6-month-olds fit the 6–9 months size in this crochet baby shoes pattern, with an 11cm sole — but always measure the baby’s actual foot against your finished sole before assembling the upper. Crochet baby shoes pattern & guide — written for makers who want a real, detailed, round-by-round tutorial. Happy hooking! 🧶